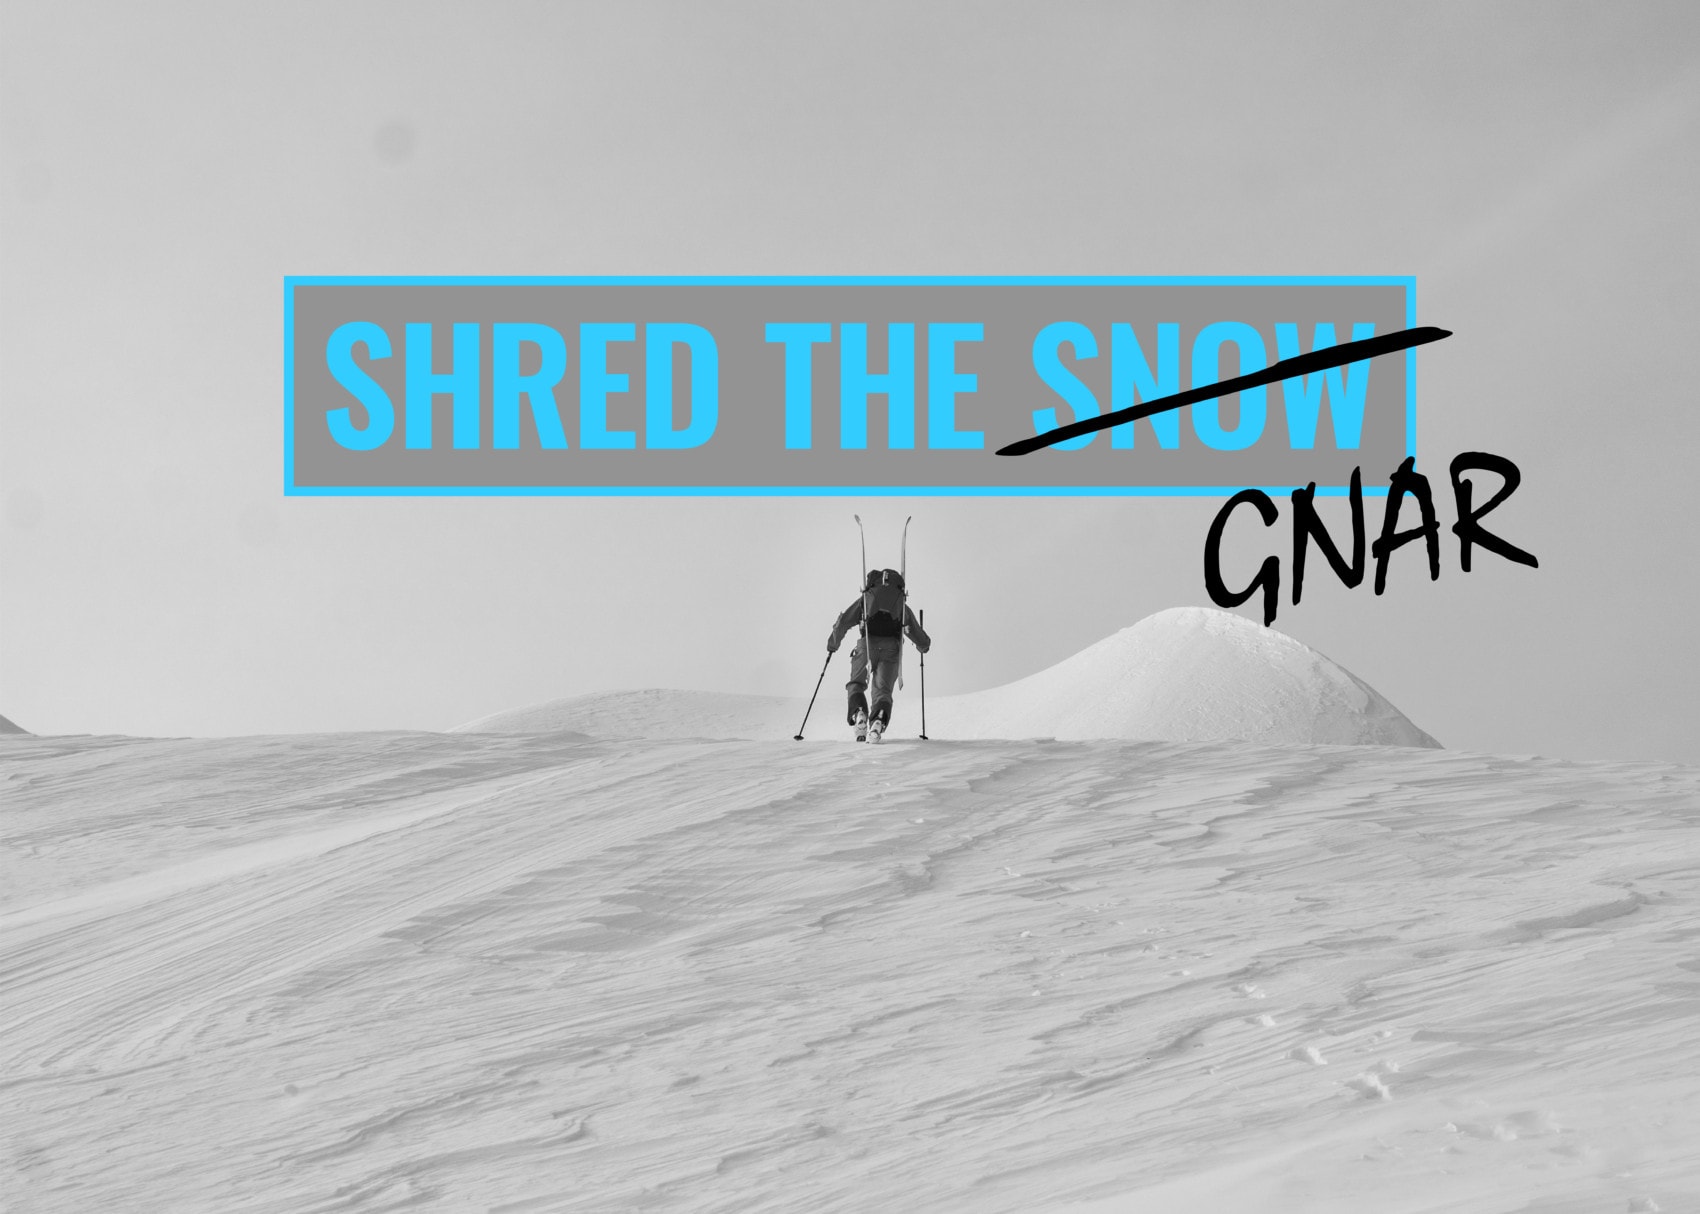
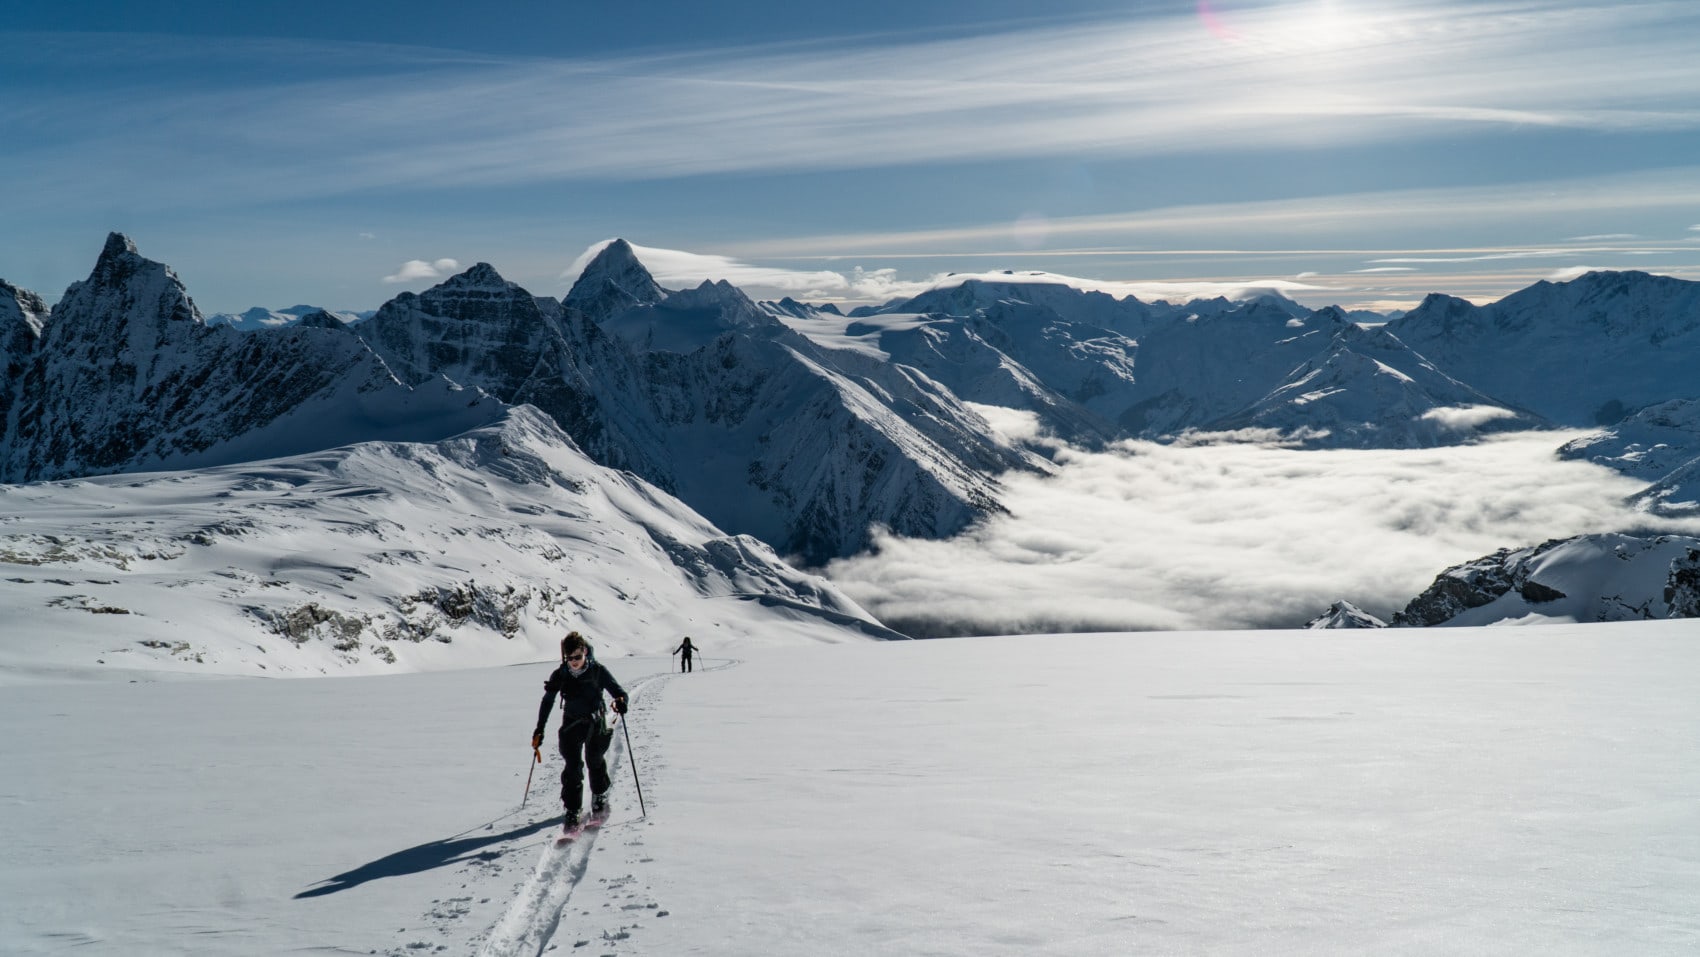
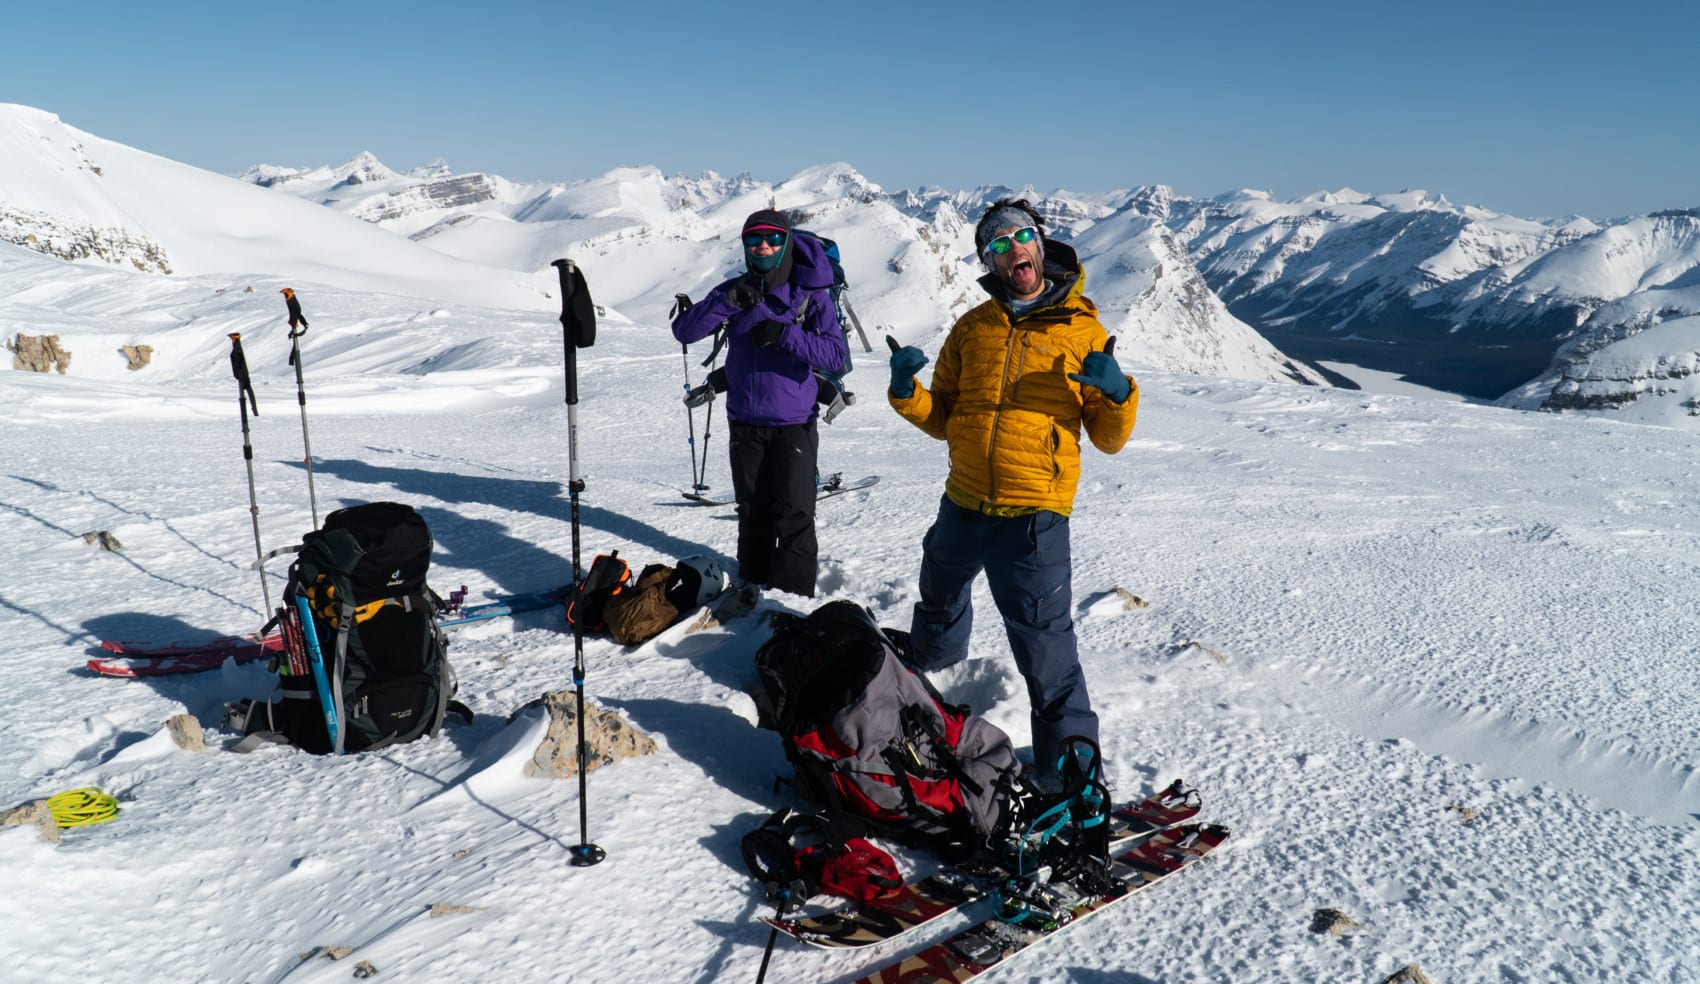
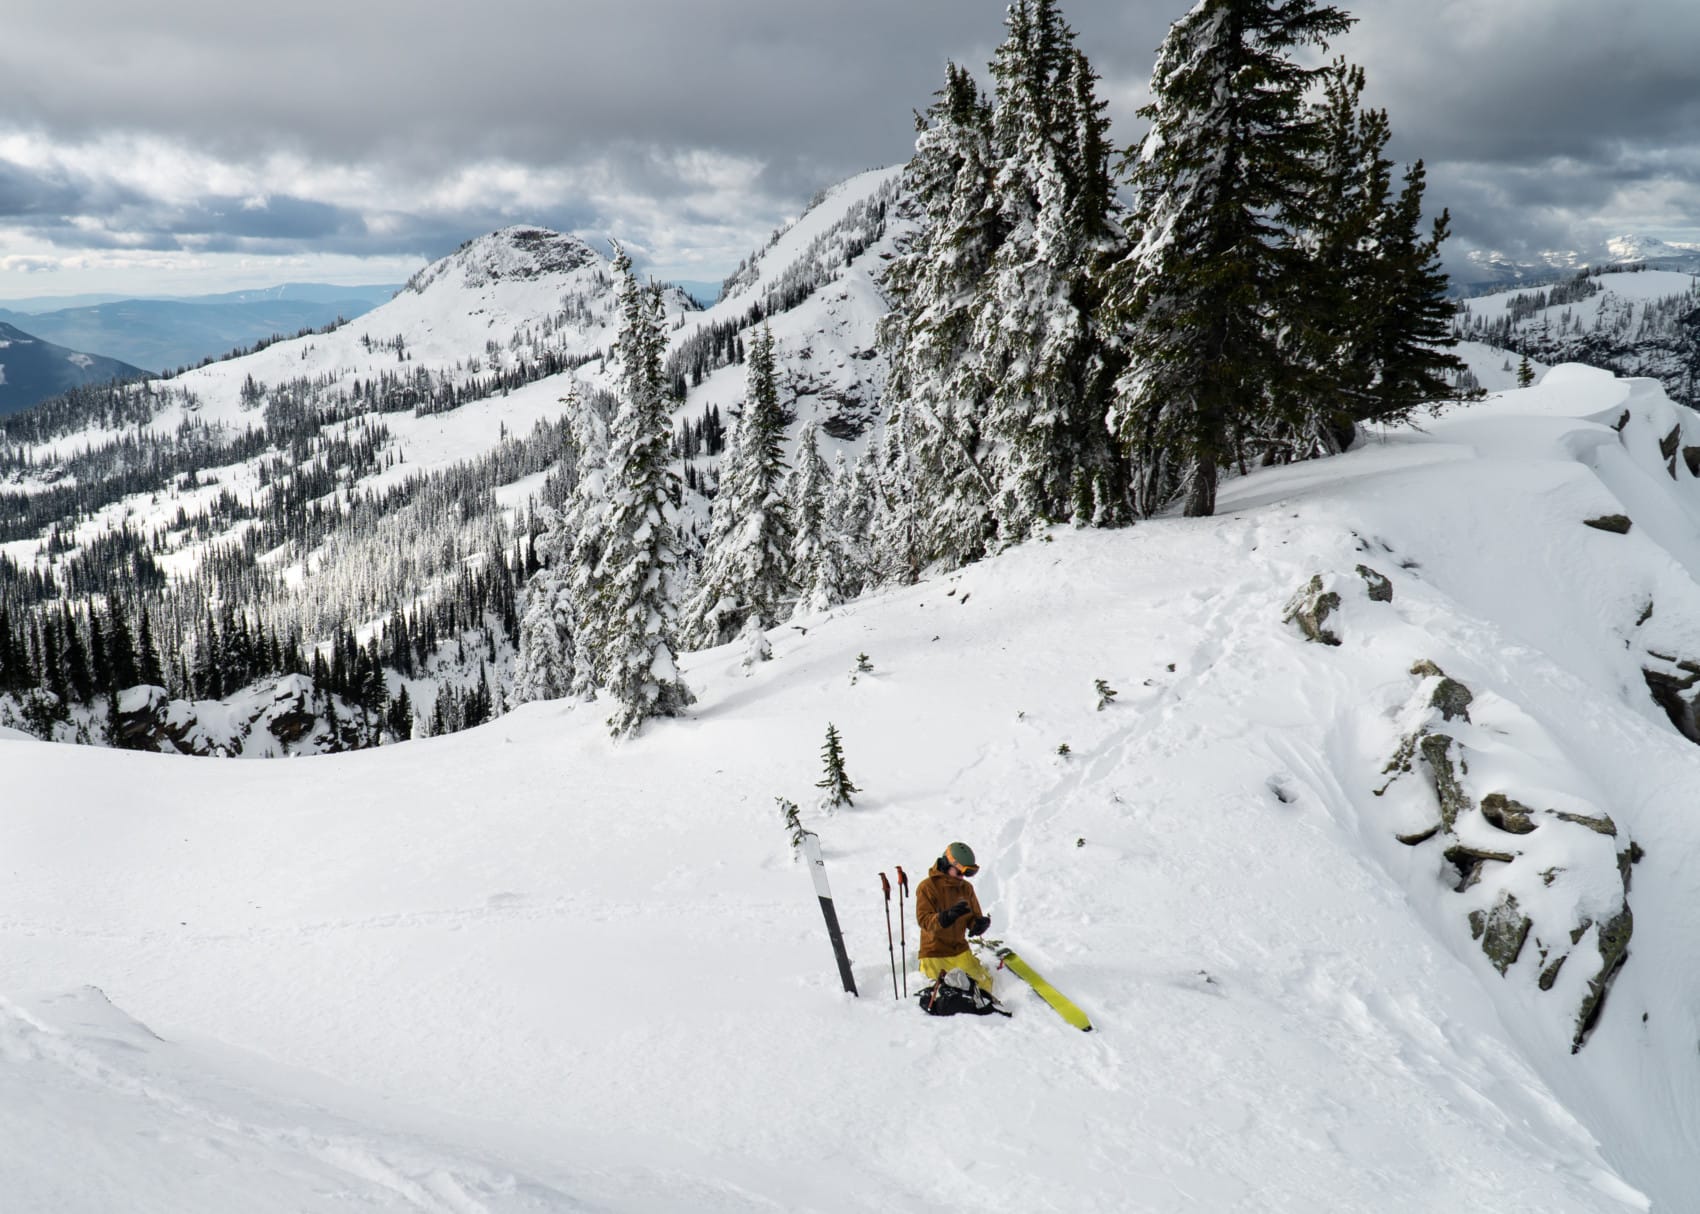
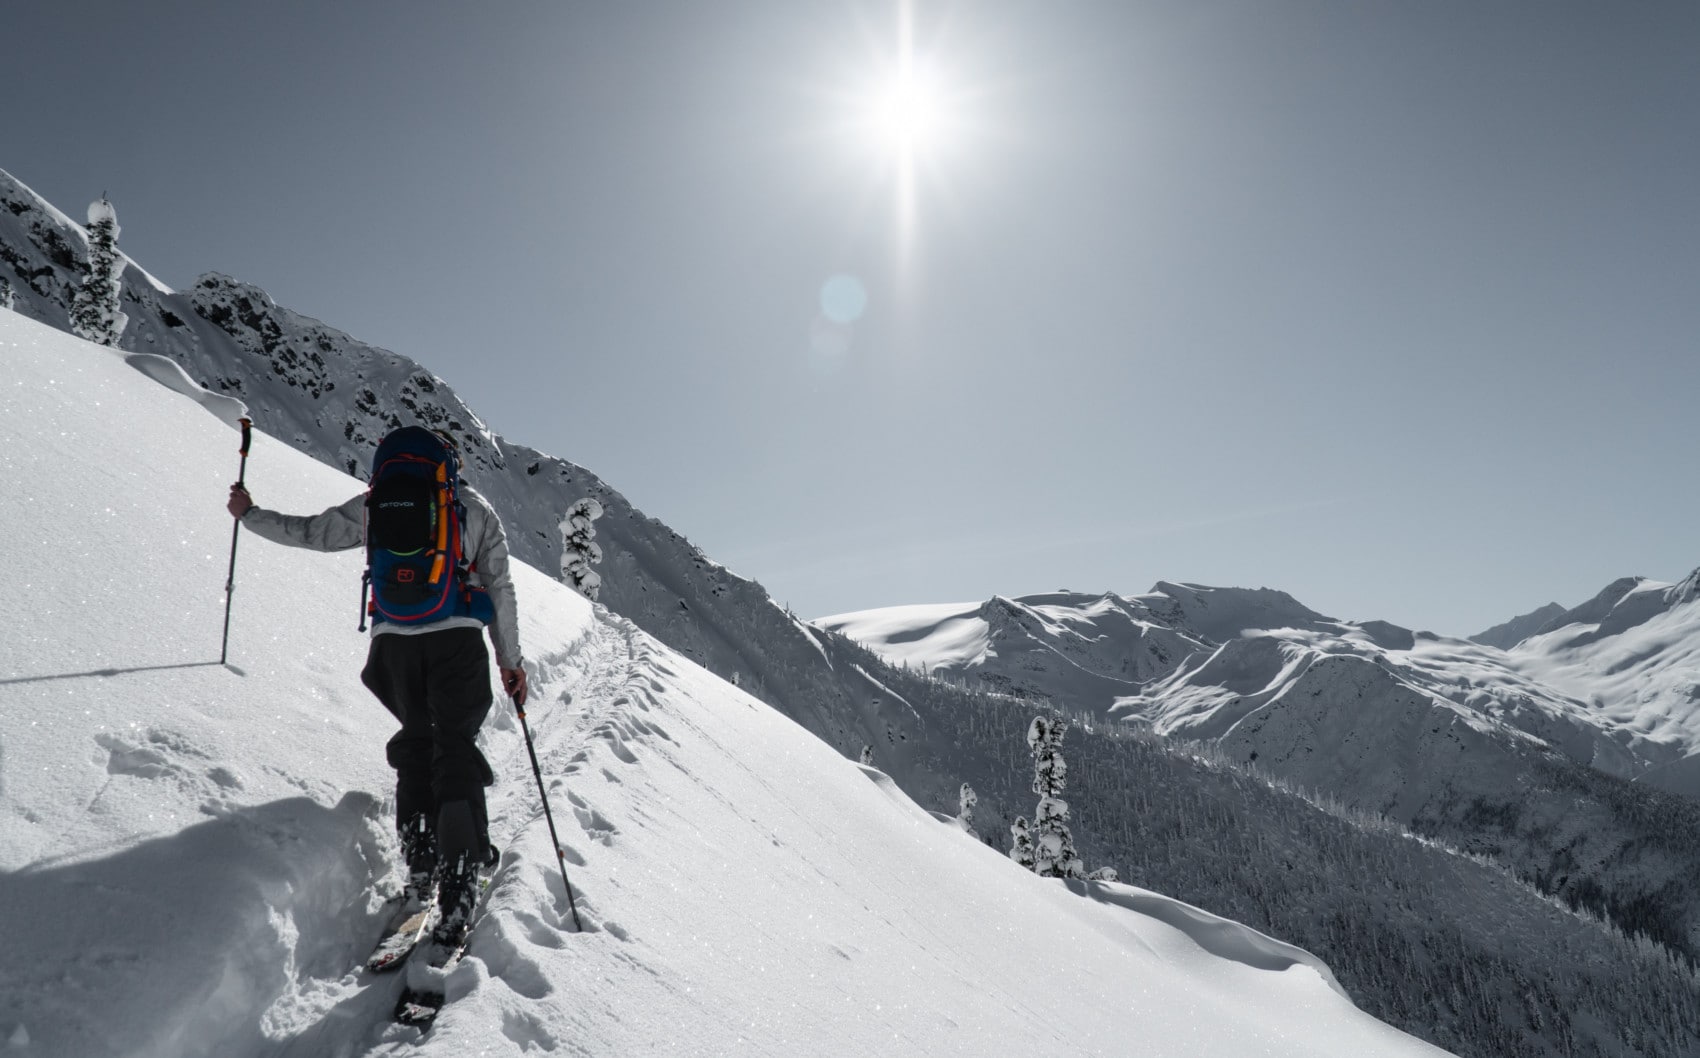
After tossing around the idea, I’ve finally decided to write an in-depth article on my life’s passion. I recognize it’s quite a mysterious sport and a very daunting discipline to start with, which begs the question: how do you get into ski touring? Once you’ve understood the basic terminology (detailed below), it requires proper avalanche and mountaineering training, expensive equipment, and a bucketload of experience. I intend to break it down for you and shed some light on the niche sport of ski touring. My goal: establish Shred the Gnar and its associated articles as a one-stop-shop for people looking to get into ski touring through interesting, but structured content. Stay posted for updates as I further delve into the world of ski touring gear, discuss avalanches and publish guides on how to use the online resources!
Terminology
Like any sport, ski touring fanatics use a bunch of technical and casual jargon on a daily basis. Let me quickly shine a light on some of the fundamental terms. Only then will you blend in with the scruffy mountain pros out there. Now, before getting knee-deep into complex terms, let me introduce the one word to rule them all: GNAR. I use it all the time and people often ask me about its meaning.
Oli's Gnarly Advice
What is GNAR?
It was a game. Now it’s an icon, a word idolized and often misused by skiers and snowboarders from around the globe. It’s the perfect blend of danger and coolness in the context of skiing. The word’s origins are mysterious and source dependant. From my understanding, it was formed by Rob & Scott Gaffney who created the Game of G.N.A.R (Gaffney’s Numerical Assessment of Radness) to parody the inherent cockiness of the early 2000s ski industry. It was a legendary game where self-proclaimed “pro” skiers would complete perilous, cool and ridiculous challenges on the slopes of the Squaw Valley Resort high in the Sierra Nevada Range of California.
Here’s an example illustrating the use of GNAR. If Joe was to shred the gnar, Joe would search for opportunities to prove that he is indeed the best skier on the mountain by launching off large cliffs and skiing steep terrain butt-naked. The challenges usually involved little to no clothes. After showcasing his death-defying skills, Joe would hear the following at the bar:
- “Bruh, Joe is the real SKIBOSS. What a gnarly dude!”
- “Bruh, is Joe a pro? Anyway, this guy sends the gnar.”
- “Bruh, Joe is GNAR-BAR.”
This is the true meaning of gnar… according to my understanding of this impossibly complex term and its exhaustive list of derivatives.
Ski Touring Terms
Ski touring, alpine touring, backcountry skiing, ski-mountaineering… to some those are synonymous to the sport of climbing mountains on lightweight skis and ripping down at Mach 3. Ski touring is the sport, the overarching term that encompasses the discipline. Backcountry skiing and alpine touring refer to the locale in which the sport is practiced. The former evokes a remote area while the latter, the alpine elevation of a mountain.
There’s a thing called sidecountry touring, otherwise known as slackcountry. It refers to the practice of gaining most of the elevation through a mechanized lift system and then touring outside of the resort’s boundary. Some consider it lazy. I think it’s very convenient. Sidecountry touring is a great alternative when your weekend warrior friends guilt trip you into showing them what ski touring is all about. Meanwhile, you’re on your tenth ski day in a row, you can barely climb up your bunk bed (shared with your 8 roommates) and your quads feel like bags of sand. First world problems, right?
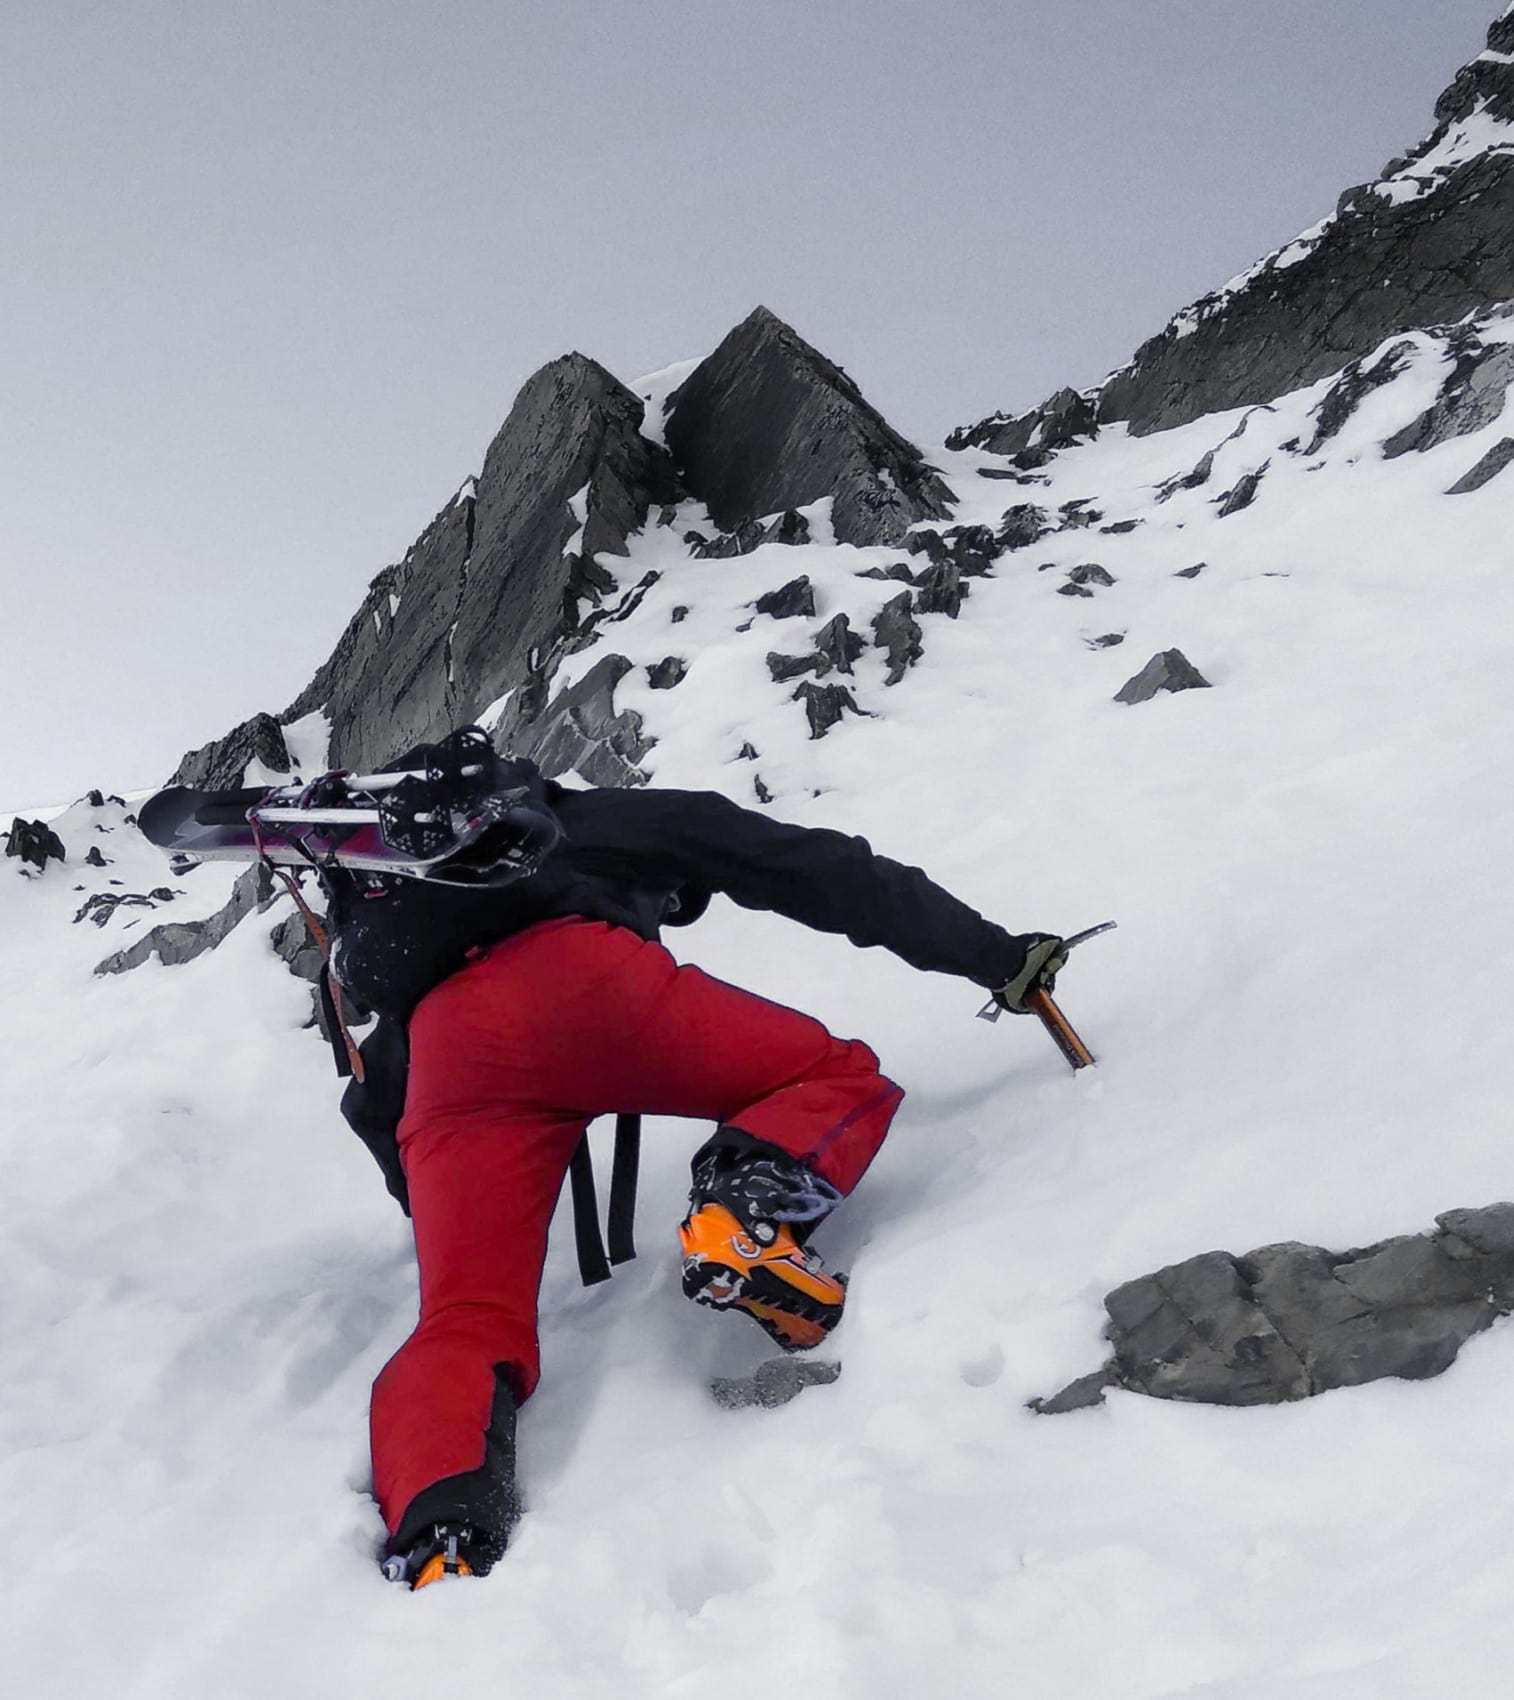
As soon as you travel over glaciated terrain or introduce roped rappels, a climbing or scrambling section, you are practicing ski-mountaineering. Most of my trip reports, such as the one covering the Sapphire Col Traverse, are within the realm of the discipline. While most mountain folks think of ski-mountaineers as lycra-sporting masochists, the discipline delivers the perfect blend of fitness, exploration, and adrenaline. Plus, what’s not cool about walking back to town with a questionably thin rope coiled around your chest and a harness full of weathered gear.
Certifications and Courses
Ski touring takes you through mountainous terrain. It’s after years of experience that you’ll realize your playground is literally out to get you. You name it: avalanches, rockfalls, crevasses, storms, whiteouts, cliffs… and that’s only the start of a long Christmas list. Practical courses are essential in equipping yourself with the knowledge required to identify and avoid hazards, hereby preventing injuries or, worse, death.
Oli's Gnarly Advice
Avalanche Skills Training
Before heading out, I heavily recommend completing an Avalanche Skills Training (AST Level 1) which teaches you the basics of avalanche terrain management. Avalanche professionals show you how to travel through avalanche-prone terrain, understand the snow mechanisms at play, and identify the hazards hidden under the surface.
Related: The Early Season Snowpack: How It Affects Your Winter
If you want to delve deeper into snow science, you can read through the book, Staying Alive in Avalanche Terrain.
First Aid Training
When events take a turn for the worst, you’ll need the tools to patch up your ski buddy… or yourself. A first aid training teaches you how to treat life-threatening injuries and illnesses as well as perform CPR (Cardio-Pulmonary Resuscitation). It also equips you with a foolproof system for identifying injuries or illnesses at play. Backcountry-specific courses like the NUEC-1 (Non-Urban Emergency Care). Another option is the Wilderness First Aid certification which teaches practical interventions with resources found in the wild or in your backpack. For instance, you’d learn how to make a stretcher from twigs and bits of old rope. What’s the difference between both courses? NUEC-1 discusses human anatomy and physiology granting you a deeper understanding of the mechanisms contributing to the injury or illness.
Crevasse Rescue Course
As you get more caught up with ski touring, you will inevitably come across glaciers. Those huge icy expanses formed eons ago present their own set of problems, mainly:
- Crevasse
- Moat (bergschrund)
- Serac
- Whiteout
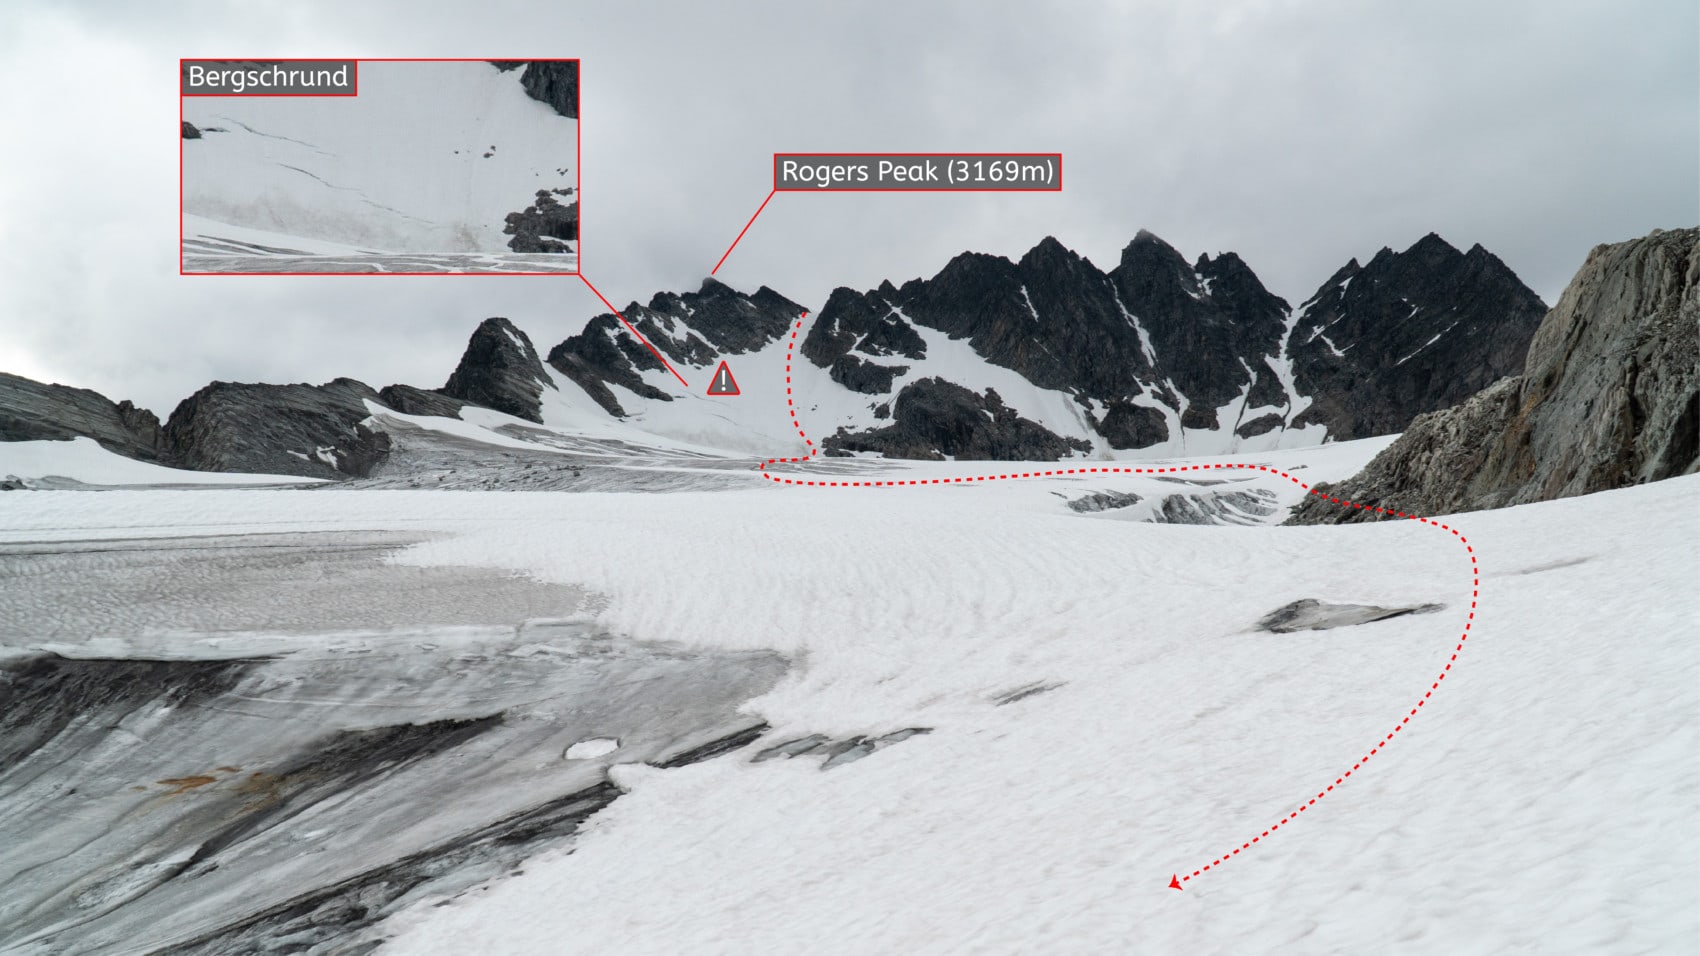
Commonly encountered, crevasses are gaps in the glacier’s surface, ranging from superficial cracks to deep voids. For instance, the Vallee Blanche, a collection of large glaciers in Chamonix, France, has thousands of crevasses, some more than 300m deep. Year-round, they are hidden beneath the snow, waiting for a climber or skier to unknowingly step right in their gaping maw. In summer, you can spot them from a distance as they open up. In winter, however, the additional snow exacerbates the danger. Don’t underestimate them! I’ve had a few near-death experiences by skiing over thinly covered crevasses and heard horrifying stories of mountaineers simply vanishing.
That’s where a glacier travel and crevasse rescue course becomes essential. If you or your buddies ever fall in a crevasse, you’ll have the means to organize and execute a roped rescue. You will also learn how to rope up for glacier travel. I always recommend an awesome book, Mountaineering: Freedom of the Hills. It’s the definitive mountain bible. While it has a much greater scope, the glacier travel section is of particular interest.
Ski-Mountaineering Course
Let’s face it, extreme sports enthusiasts (like me) have a slight propensity for danger. People around you will inevitably worry when you go for what you misleadingly call a “casual” stroll in the alpine. To appease your significant other, I recommend taking a ski-mountaineering course where you will learn how to navigate glaciers and rappel into a gnarly line. Doesn’t it sound fun?
Ski Touring Equipment
Ski touring takes you through notoriously unforgiving terrain where you will rely on your gear. I’ve elaborated below on a list of essentials to get you started on your quest to shred the gnar. Check out the Don’t Fear The Gear series to get a deeper look into the specifics of ski touring gear.
Here’s a quick side note on gear design. There’s a difficult problem that makes gear manufacturers scratch their heads. Consumers expect their gear to be extra light, especially those that weigh their gear down to the milligram. On top of being a featherweight, they also expect it to be rock-solid and usable. I’m amazed at how well the industry has solved the dilemma by using innovative designs and researching new ways to blend conventional materials with cutting-edge composites (look at the Salomon Shift MNC-13 bindings).
Oli's Gnarly Advice
Avalanche Gear
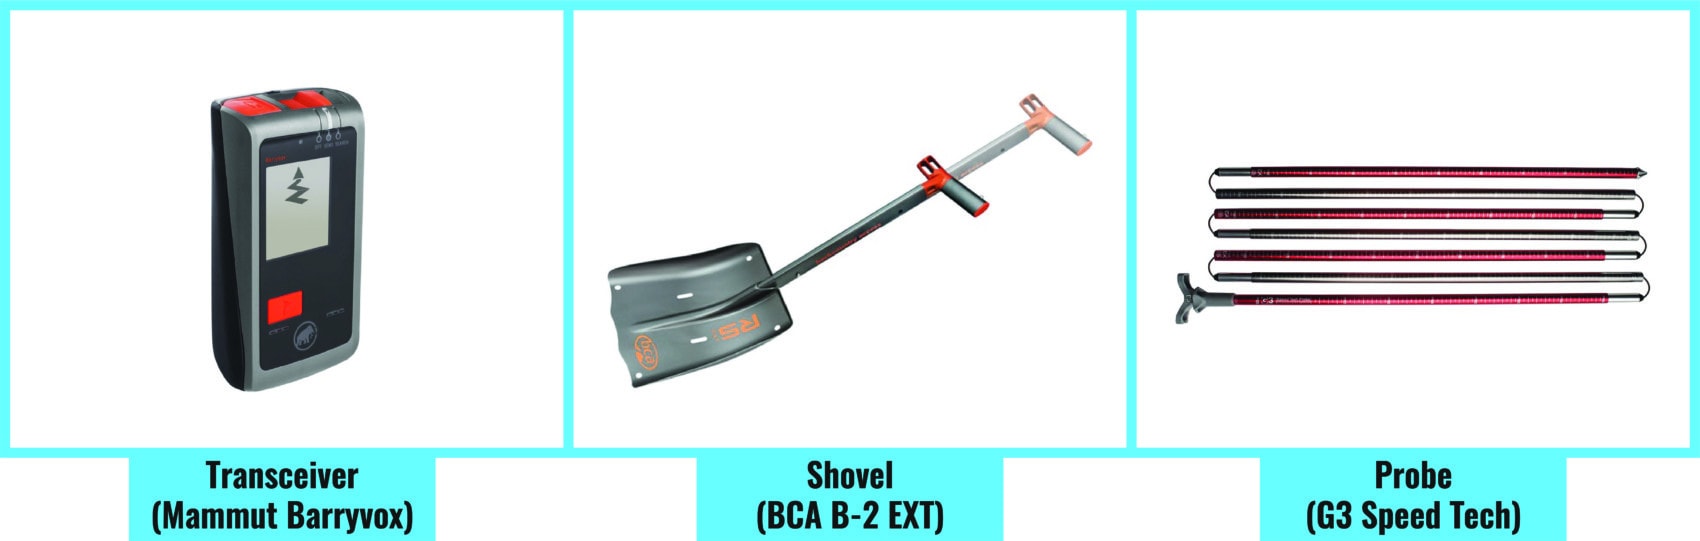
The Gnar Essential: transceiver, shovel, probe. Not beacon. Canadians don’t use the word “beacon”. The grammar police (me) will correct you. Those three words are drilled into my brain. I constantly remind riders of them as they duck the rope from the resort into the backcountry. People often ask me if they can forgo buying the probe for instance. The answer: absolutely not! The transceiver, shovel, and probe are part of an established system used to extract avalanche victims from bulletproof snow, a technique taught in the AST-1 course. Simply put, do not head out ski touring without your transceiver, shovel, and probe.
For a closer look: How To Choose An Avalanche Transceiver / Beacon
Oli's Gnarly Advice
The Gnar Triad
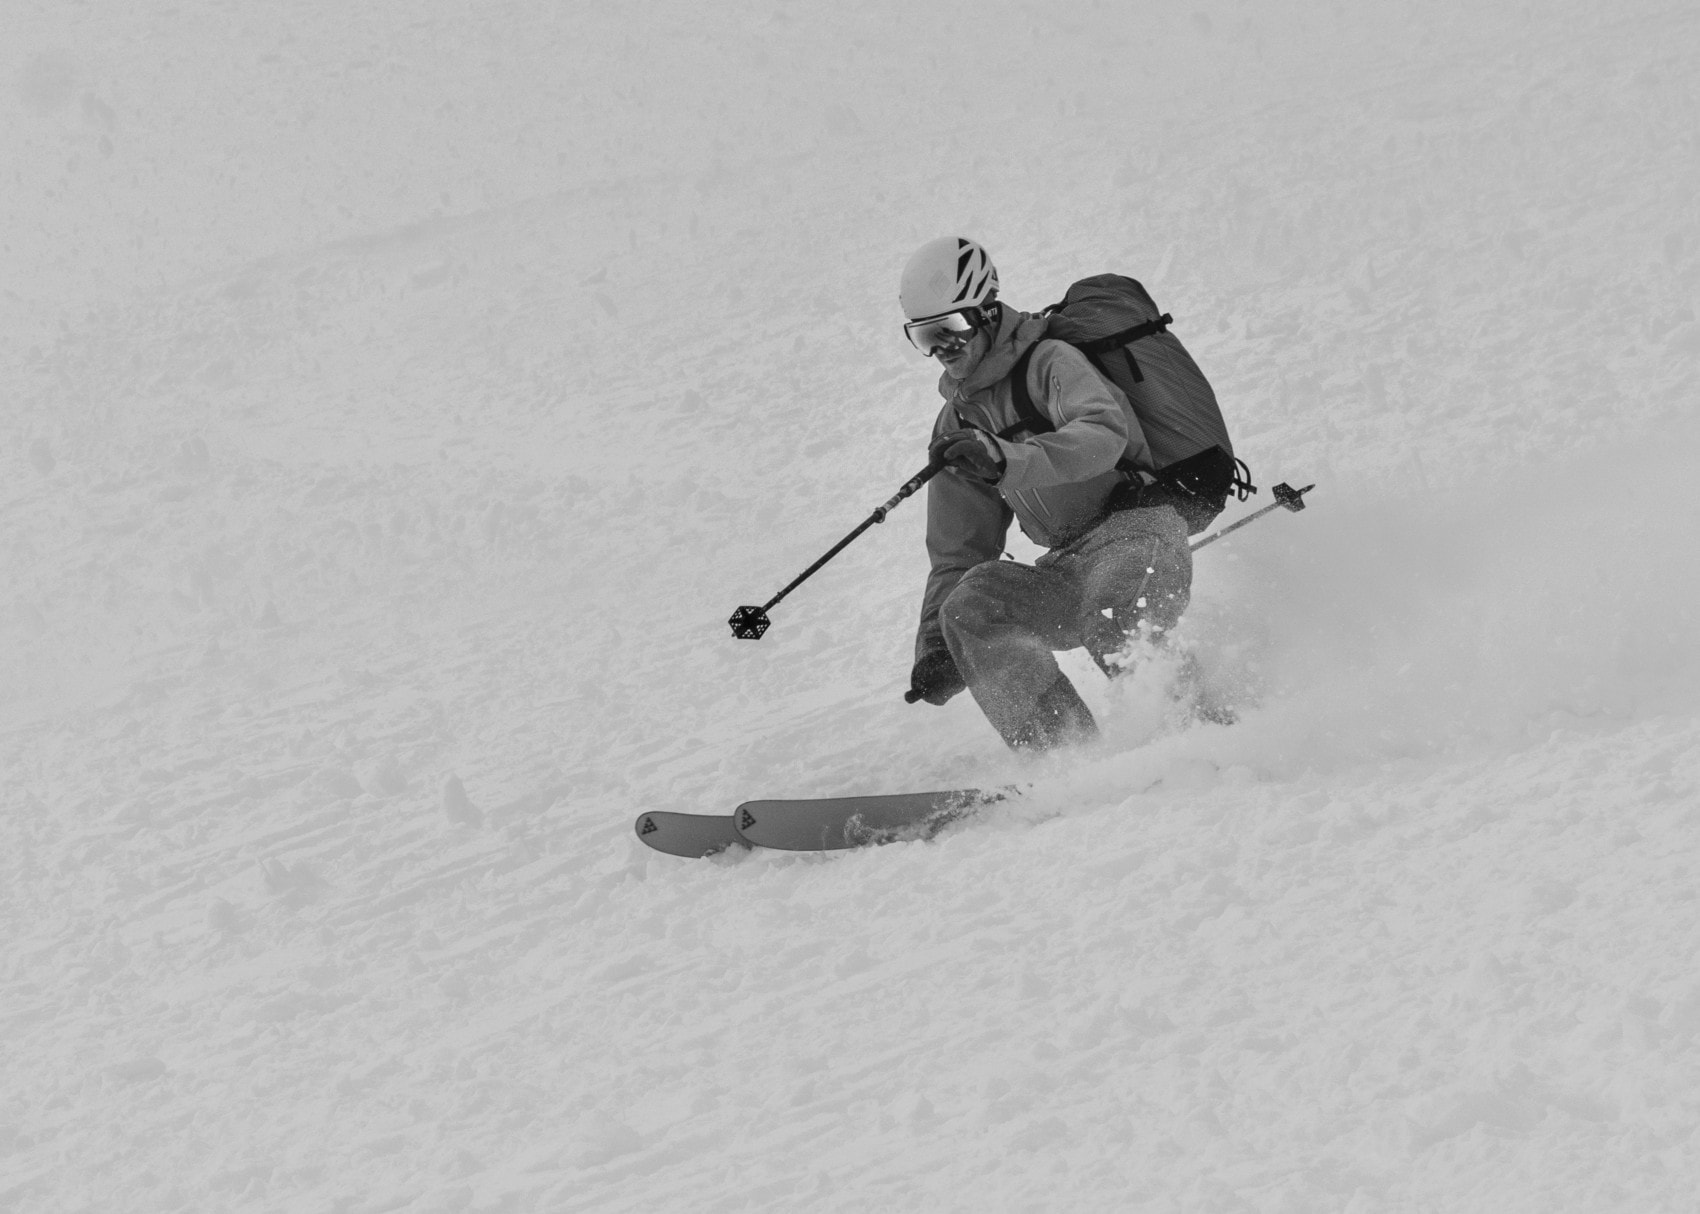
Boots, bindings, and skis. Three items that form your shred setup, which I hereby name the Gnar Triad. Let’s think about it for a second. Close your eyes and imagine yourself skiing down a powdery slope. The cold champagne powder blows across your face while you’re cutting two meandering lines like two highlighters across a blank page. Now, focus on your legs, specifically the mechanical forces coursing through your body. As you relieve pressure to transition into the next turn, those forces are transferred from your thighs through your boots, bindings, and skis in that order. All three must work in tandem to provide the best experience. Actually, I meant to write all four, including your quads. Never skip leg day!
Ski Boots
I always start a discussion about skis by asking if the boots are sorted out. A good pair of ski boots can make or break a ski touring mission. I completed the Wapta Traverse through the Canadian Rockies in winter 2020 – details in The Wapta Traverse: A Jaw-Dropping 6-Day Ski Tour and then the 6-day Bostock-Revelstoke Traverse in 2021. It was a stunning, but painful adventure with 5 consecutive days of red blisters. It definitely changed my outlook on boots. Before diving deep into the technicalities, remember this critical piece of advice: find a ski boot that fits your foot.
For a closer look: How To Choose Ski Touring Boots in 2024
Ski touring boots are a compromise between the uphill and downhill performance. Add durability to the mix and you’ve got an interesting dilemma. Most boot manufacturers have a range of models available from featherweight boots for ski-mountaineering freaks focusing on the climb to freeride skiers prioritizing the descent. There are however a few specific features that are common to all models:
- A selective walk mode which decouples the upper cuff movement from the lower shell.
- An increased articulation of the upper cuff and lower shell to allow a comfortable gait.
- A grooved rubber sole (Vibram) to ease climbing over rocks when gaining ridges and peaks for instance.
- Toe and heel pin inserts, anchored in the plastic sole and compatible with pin and hybrid bindings (discussed here).
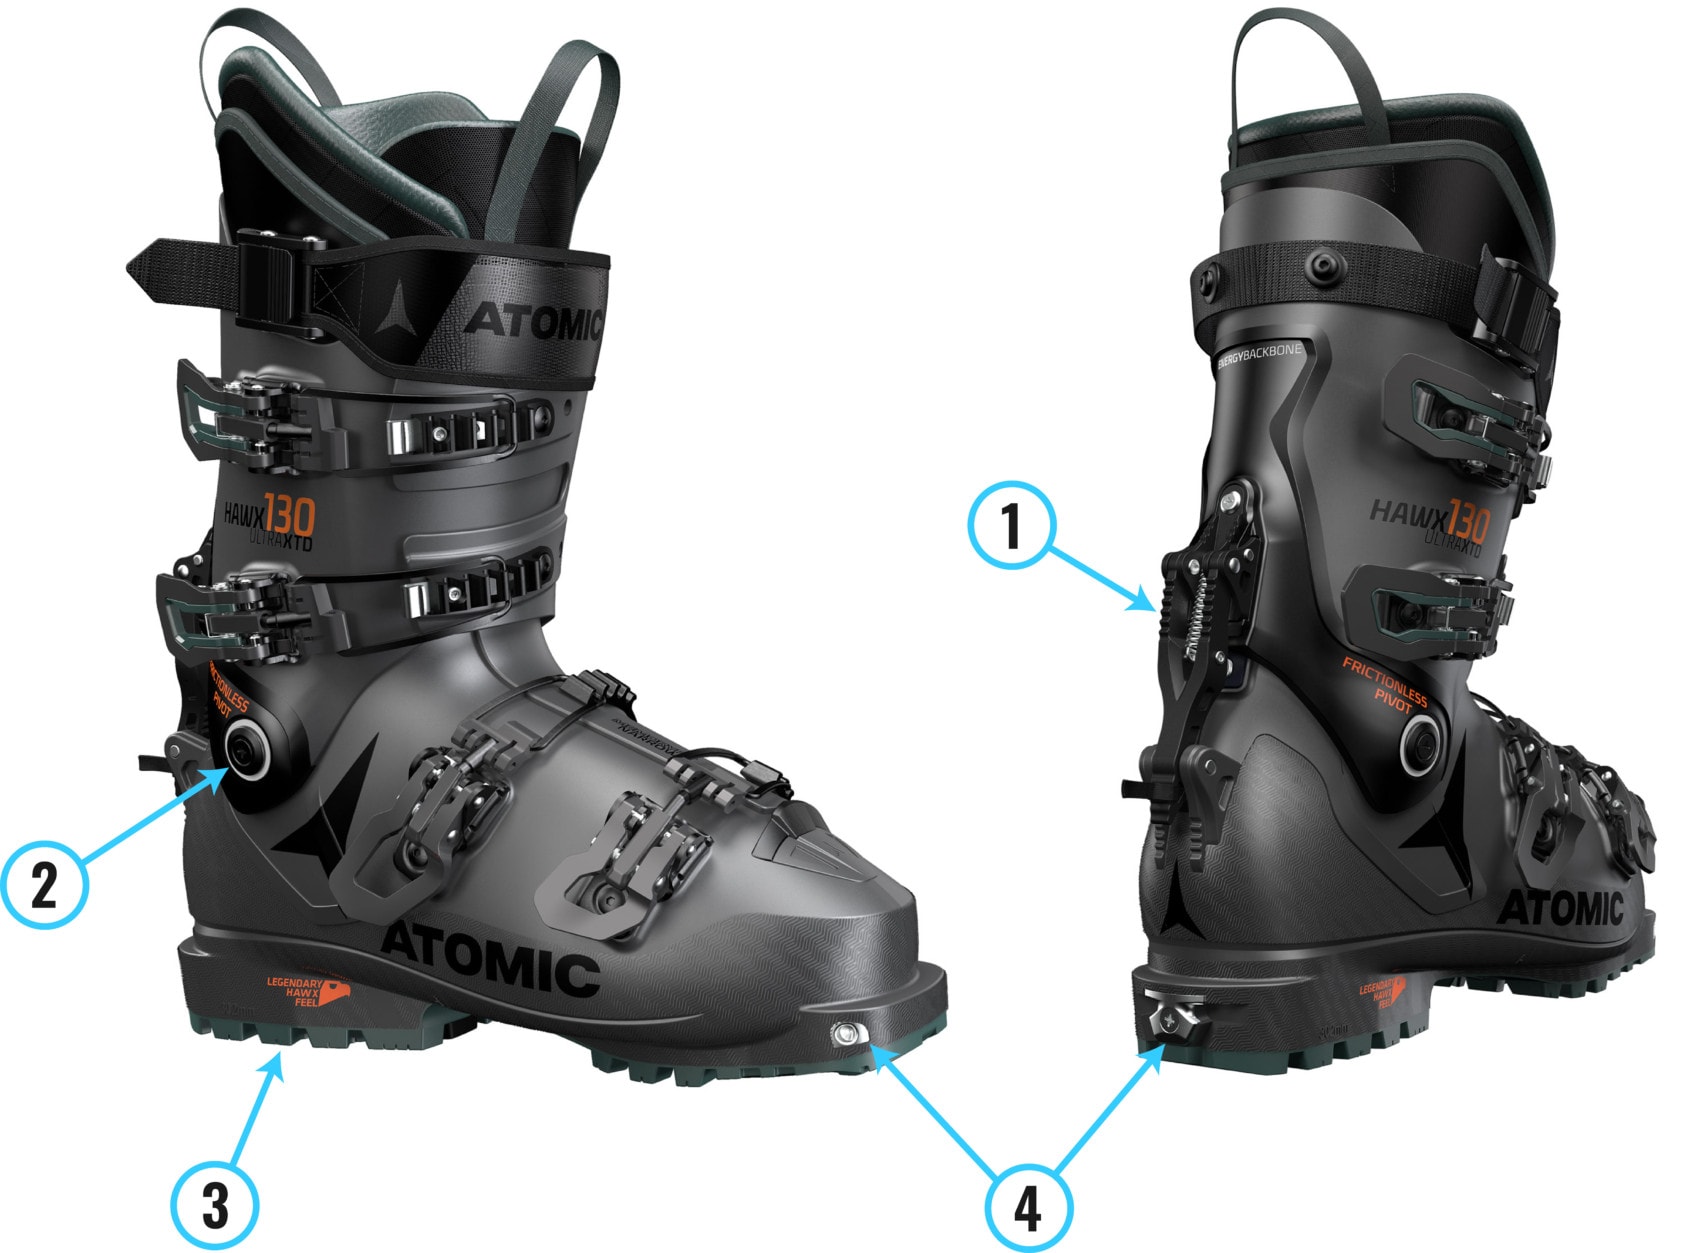
If you can’t find the above design features in the boot you are considering for ski touring, walk away.
Here are a few examples to clarify my point. On one end of the spectrum, models like the Dynafit TLT Speedfit PRO replace plastic components for composite parts to reduce weight, a design change that comes at the cost of poor downhill performance. If you plan on completing long multi-day traverses with some mellow skiing in between, a model along those lines is a great option. On the other end, models like the Lange XT Free 130 provide excellent downhill performance but are heavier on the uphill. If you want one boot to shred the resort and occasionally duck the orange rope into the sidecountry, this boot would be perfect.
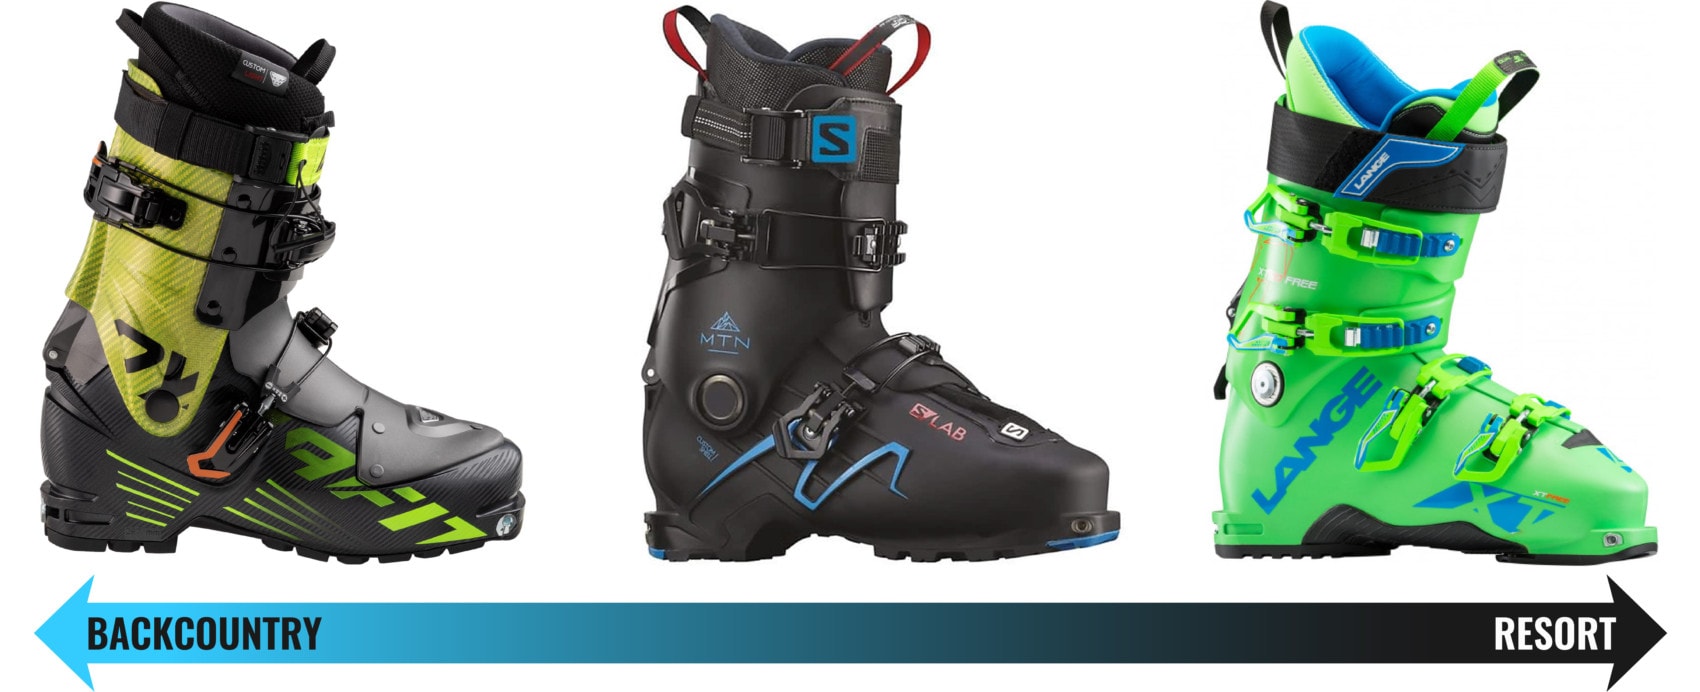
Personally, I lie in the middle whereas I want a jack-of-all-trade, master-of-none boot. After a few tours, I am now convinced the Atomic Hawx Ultra XTD 130 provides exactly that at a fraction of the weight compared to boots within the same market segment. I’ll provide an update on durability as the season goes on.
Oli's Gnarly Advice
Ski Bindings
I nerd out on intricate nuts and bolts systems. It’s no surprise bindings are precisely my jam. I could go on about binding design for days, but I won’t… for your sake. Here’s the summary. You’ve got four common alternatives including the SHIFT bindings, a proven ground-breaking option (which will probably become the reference design in the coming years).
For a closer look: How To Choose Ski Touring Bindings in 2024
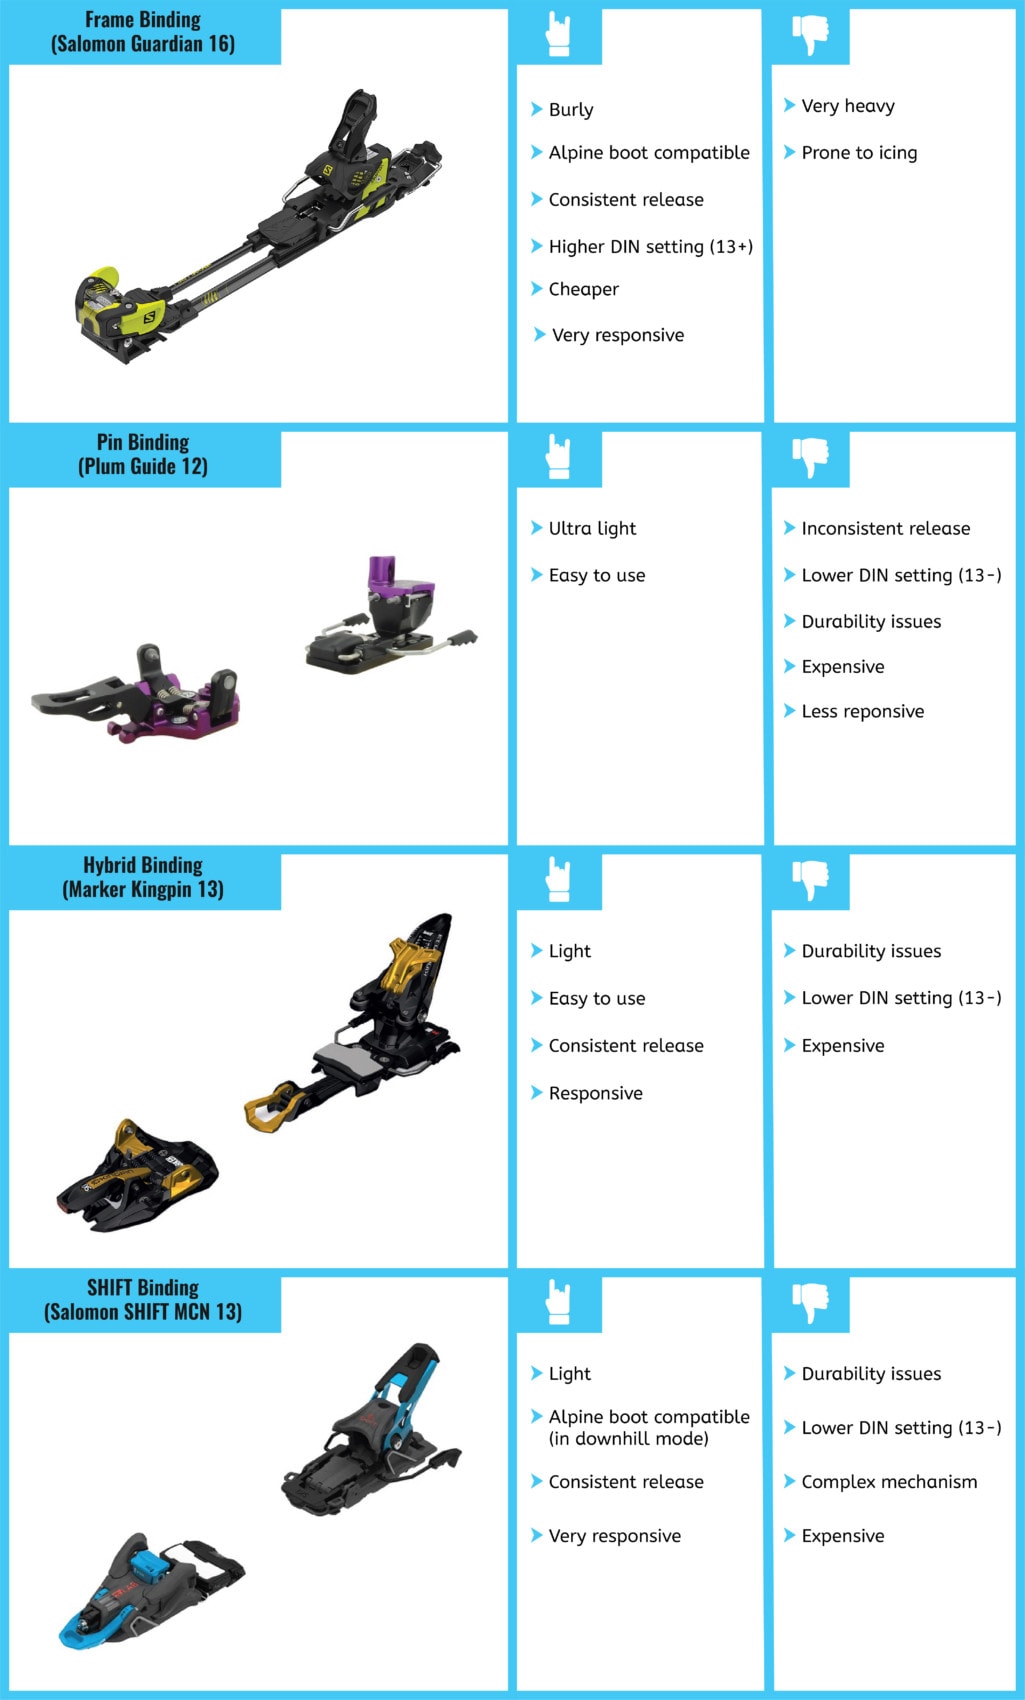
Again, ask yourself the following: what do I plan on accomplishing with my new setup? For multi-day traverses, pin bindings are king. For hard-charging, adrenaline-fueled daredevils, frame bindings are bomber. For people like me searching for one binding to do everything, the hybrid or SHIFT bindings will do just the trick. In reality, I’ve got a dedicated resort, sidecountry, and backcountry setup. Unless you’ve got stacks of cash, it takes years to purchase.
Oli's Gnarly Advice
Skis
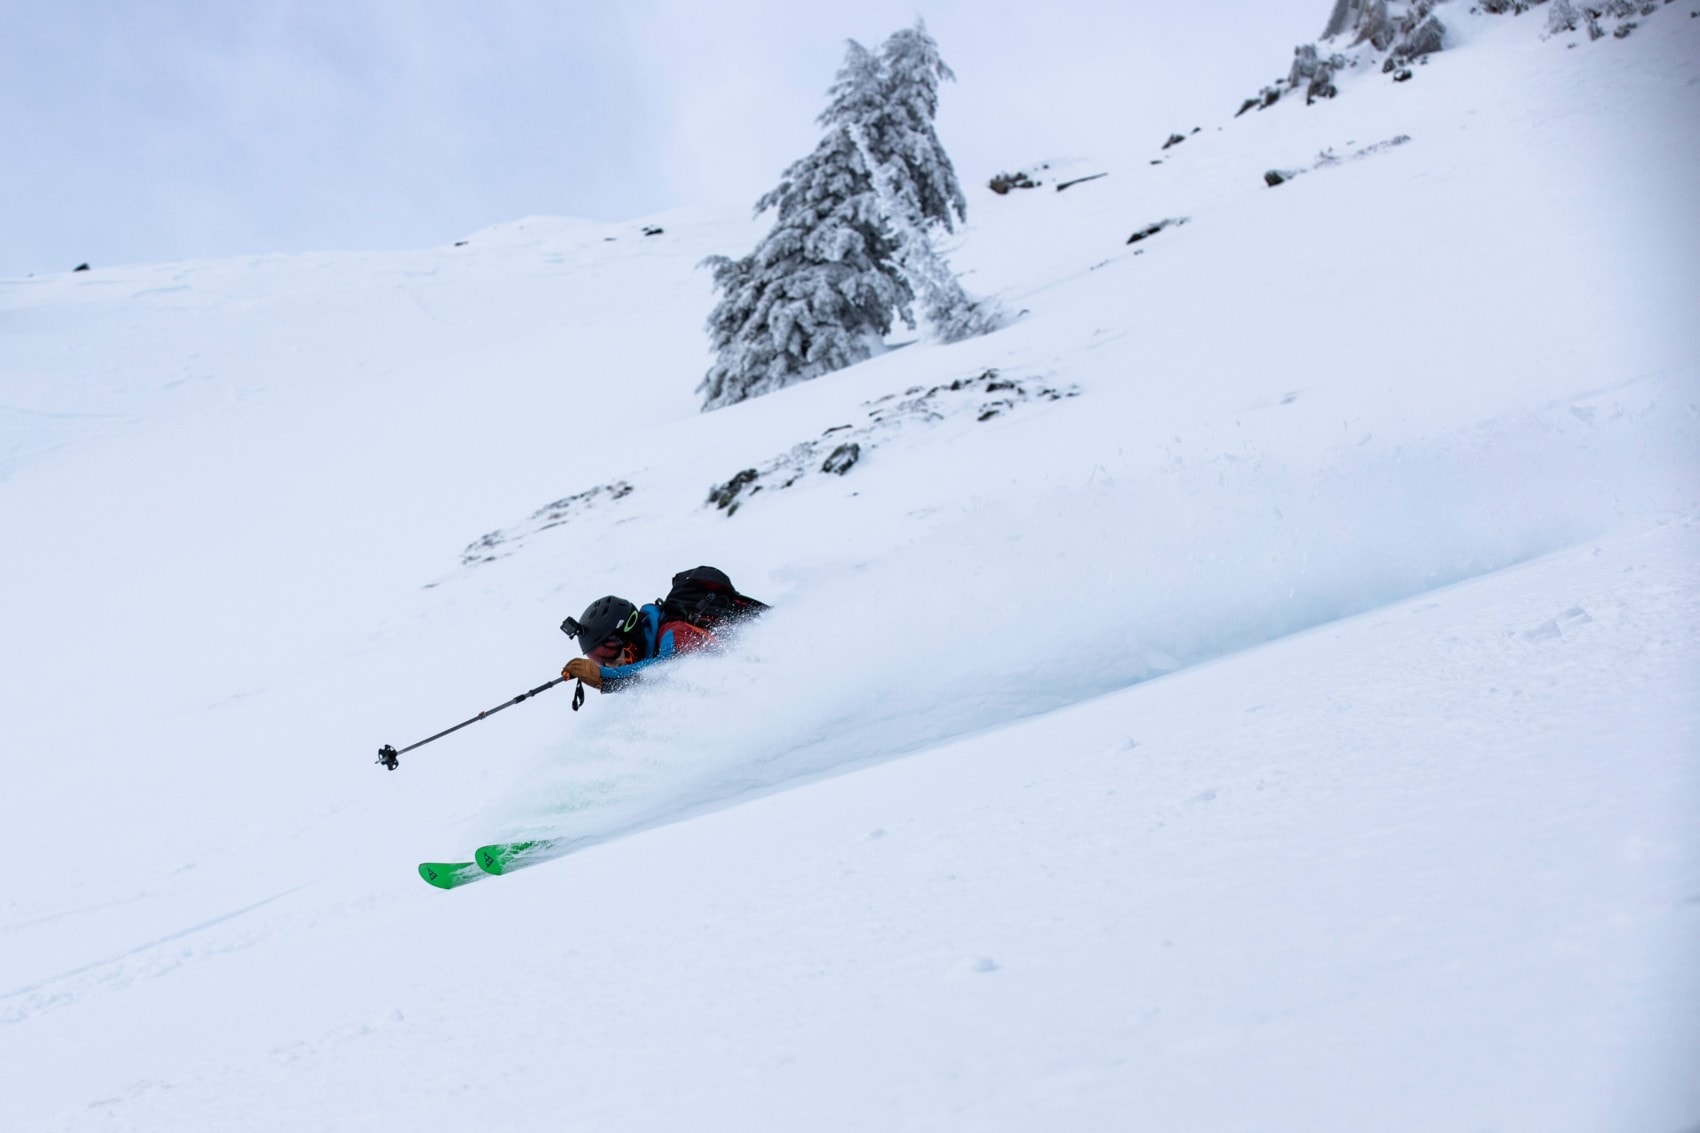
Here’s the short version that the salesperson doesn’t mention. As you now know, gear manufacturers are tasked with balancing weight, durability, and usability. In the ski world, we call the latter “performance”. Naturally, unless you enjoy needlessly torturing yourself, you would want your skis as light as possible. I prefer to avoid lugging a 10lb setup up 2000 vertical meters. However, featherweight skis equate to rattly noodles that will guarantee a swift death on sketchy slopes. While ski designers are getting great at minimizing weight and maintaining top performance, sacrifices must be made. Personally, I climb mountains to ski big mountain lines. I need a ski that can keep up with my aggressive style. I’m happy to sacrifice some weight for better performance. It’s a balancing act.
For a closer look: How To Choose Touring Skis in 2024
In a perfect world, you would demo every ski before narrowing it down to one model (or several if you’re a gear hoarder). Truth be told: it’s hard to compare demos since they’re usually skied on different conditions. If you don’t have this option, I recommend reading reviews on reputable websites once you’ve acquired an understanding of terms like flex pattern, waist width, etc.
Oli's Gnarly Advice
Climbing Skins
Once you’ve figured out your Gnar Triad, it’s time to take a good look at climbing skins. Skins are fundamentally strips of prickly fibers that provide traction on the way up like grooves under a cross-country ski. They also provide some glide on the way down. The top of the skins (the side facing your skis) is coated with a glue formulated to adhere to ski bases without leaving residues. The glue is designed to perform adequately over a wide temperature range from arctic winter to spring skiing days.
For a closer look: How To Choose Climbing Skins For Ski Touring
How wide should you buy your skins? They generally come in 10cm increments. I recommend buying skins as wide as the widest point along your ski (usually located at the shovels or tails). Then, trim the extra material by following the manufacturer’s instructions. G3, a popular ski touring gear manufacturer from Canada, published a great tutorial on youtube.

As for the prickly fibers, you’ve got two options: mohair or nylon. Each material has its pros and cons summarized in the table below.

Knowing where you plan on ski touring will help select the right skin for you. On one hand, 100% nylon skins would be better suited for difficult terrain forcing you to set an uber-steep uptrack. On the other, 100% mohair skins are a godsend during multi-day tours where the terrain is on the flatter end. Nowadays, you can buy skins with a nylon/mohair mix. I found skins consisting of 30% nylon and 60% mohair to be the perfect sweet spot for most days. I use the Black Diamond Glidelite Mix STS skins and haven’t experienced any problems yet. When I find myself losing traction often, I’m most likely carving too steep of an uptrack anyway. I end up choosing another route up the mountain.
Oli's Gnarly Advice
Ski Poles
Ski poles are essential for the descent (obviously), but also critical on the ascent. There are hundreds of models out there that offer different construction, weight, basket, and grip shape. I prefer the length-adjustable ones as I can use the same pair for a variety of sports. I can also collapse them down to nothing and strap them to the outside of my pack when booting up a couloir for instance. Models with multiple collapsible sections are awesome but prone to breaking. Most importantly, inspect their locking mechanisms. After seeing far too many of them loosen just to have the poles retract unexpectedly, I trust the flicklock system from Black Diamond. It’s a simple design that can be operated while wearing thick gloves. It also doesn’t freeze on you.
A word on pole length. While holding the pole as if you were skiing, the angle between your arm and forearm should be at about 90 degrees. Add 5-10 cm to account for the additional height provided by ski boots and bindings. I prefer slightly shorter poles to avoid having them drag through deep powder.
Oli's Gnarly Advice
Layers
Layers are key. Period. Ski touring is hard work and you will get warm unless you’re facing a Siberian breeze. You want to avoid sweating as much as possible since it literally saps your heat. You will be cold and miserable the moment you stop exercising. That’s where the “onion peel” system comes in. It consists of several layers that can be shed as you warm up. If you’re a little chilly, you’re doing it right. I summarized the idea in the table below with common examples.

Layers
- Moisture-wicking
- Lightly insulated
- Insulated puffy
- Weatherproof layer
- Insulated parka
Examples
- Icebreaker base layer
- Fleece hoodie
- Thin down jacket
- Goretex jacket
- Thick down jacket
Oli's Gnarly Advice
Backpacks
A good ski touring backpack is your best friend. It carries everything ranging from food and water to your avalanche essentials. Invest in a high-quality backpack. It will last for years and will make your life easier in the backcountry. I’ve specified a list of features to look for in a dedicated ski touring backpack:
- A separate pocket for avalanche essentials
- An assortment of exterior straps for carrying skis and poles
- A hip belt to comfortably haul heavier loads
- A quick-access hip belt pocket for storing your sunscreen
- Cinch straps to secure the items on your back
- Large zippers and buckles which facilitate handling with gloves
- Ice tool loop
- A net for strapping your helmet on the ascent
- A zippered back panel access
For day trips involving no glacier travel or climbing, I found the optimal size was around 30-35L. As for ski-mountaineering, I aim for a slightly larger 40-45L pack to store the glacier rope, crampons, harness, and carabiners. The latter doubles as my overnight pack when staying in huts.
Common Gear
You’ll find below some of the common gear I bring on all my ski touring trips. This is by no means an exhaustive list. More can be brought up the slopes.
- Repair kit
- Medkit
- Sunscreen
- Lip balm
- Buff
- Emergency socks
- Ascent gloves
- Descent gloves
- Camera
- Helmet
- Googles
- Sunglasses
- ID card, spare cash
- Food
- Water
- Map, compass, GPS
- Trip booklet, pencil
- Pocket knife
Backcountry Resources
There’s a plethora of resources when it comes to knowing the weather and avalanche conditions as well as the rules governing protected areas. I’ve listed a few of those online tools on this page. I use those almost daily for my guiding work and my personal days in the backcountry. You’ll find below a more detailed explanation of some of those resources.
For a closer look: Planning a Ski Tour At Rogers Pass: The Online Tools
Weather Forecast
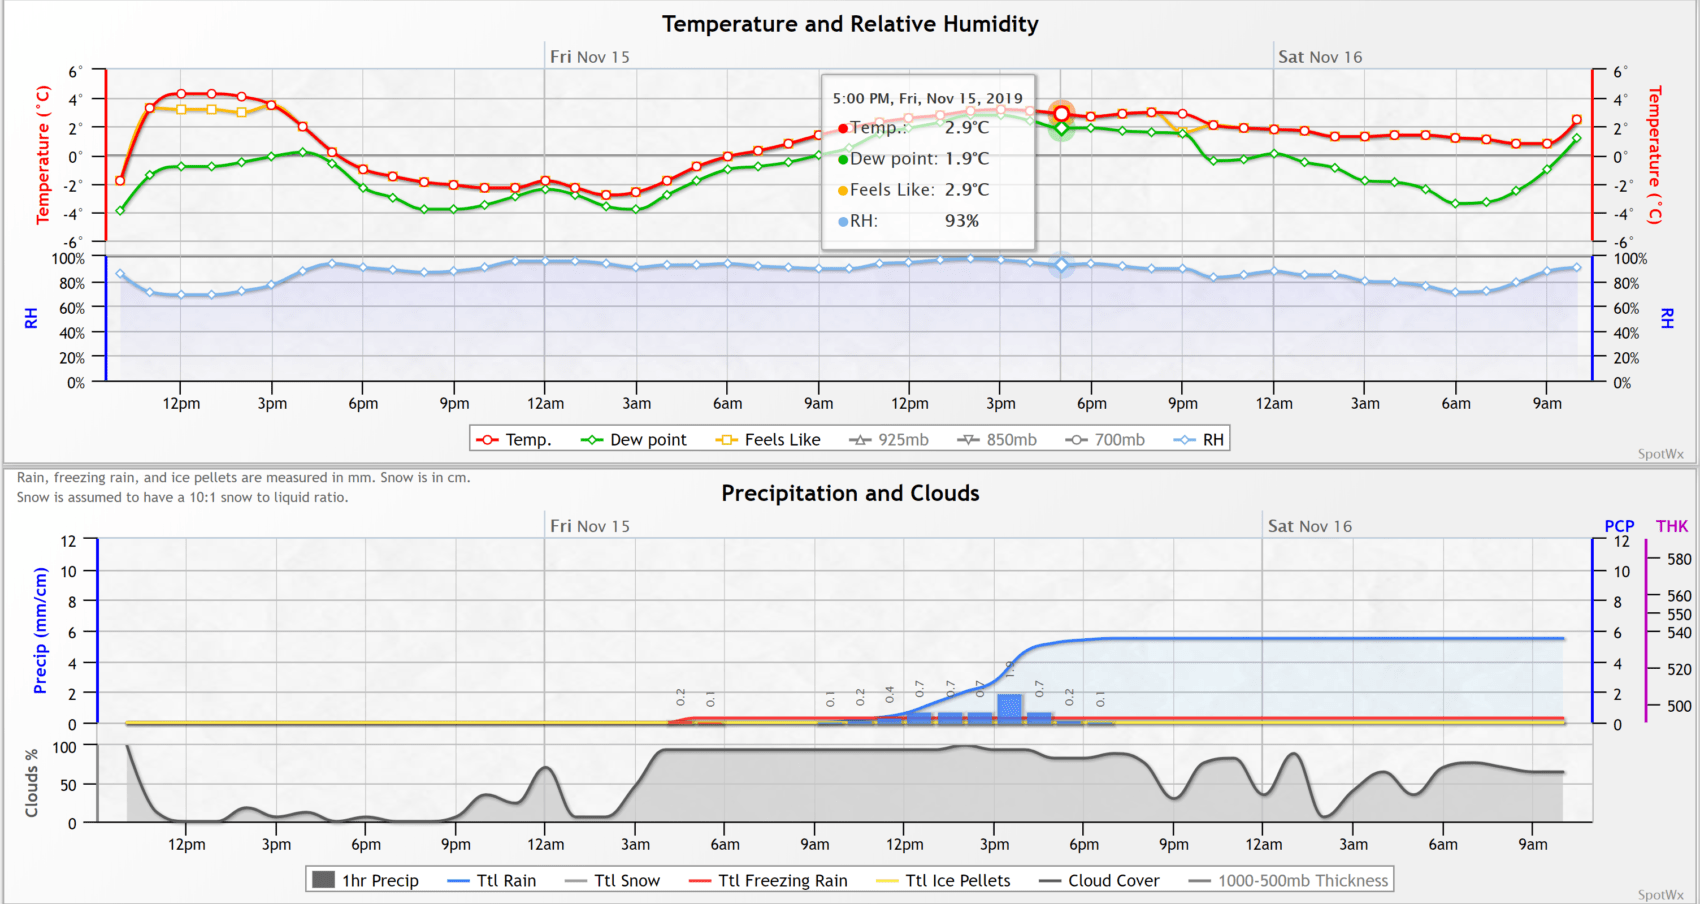
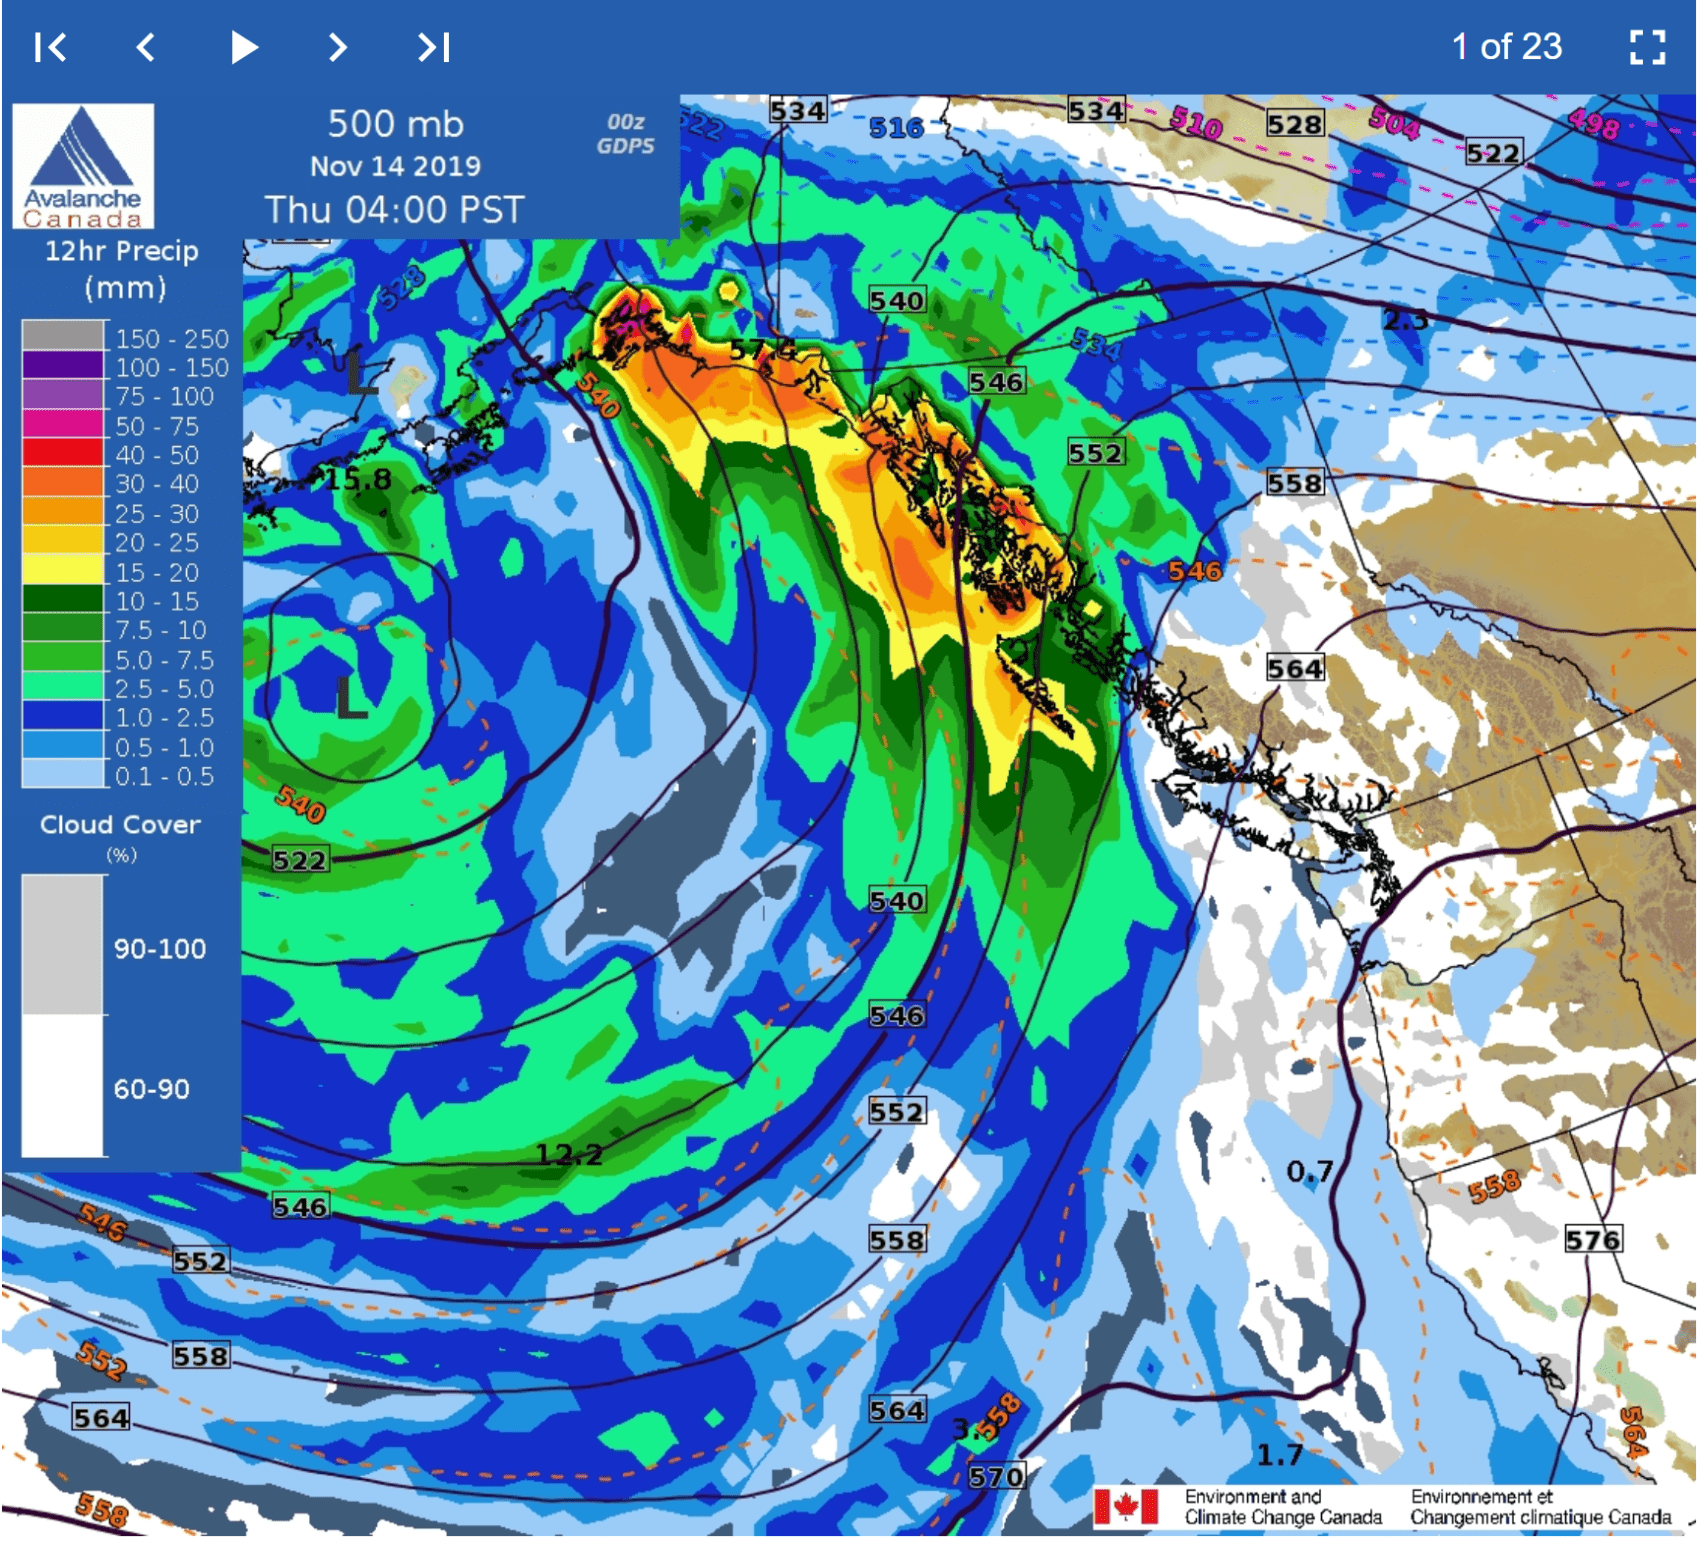
If there’s one thing that’s uncertain in the backcountry, it’s the weather. We’re lucky if forecasters can tell the weather with certainty two days out. Several options are available in this day and age. The first that comes to mind is SpotWx, a spot weather forecasting tool that provides detailed meteorological data on an hourly basis, all that free of charge. However, the website is not for the faint of heart. It requires a basic understanding of meteorology and some half-decent graph reading skills. Give it a try and don’t despair! I’ll soon publish an in-depth guide on how to interpret the data. Consider donating if you use the website as often as I do.
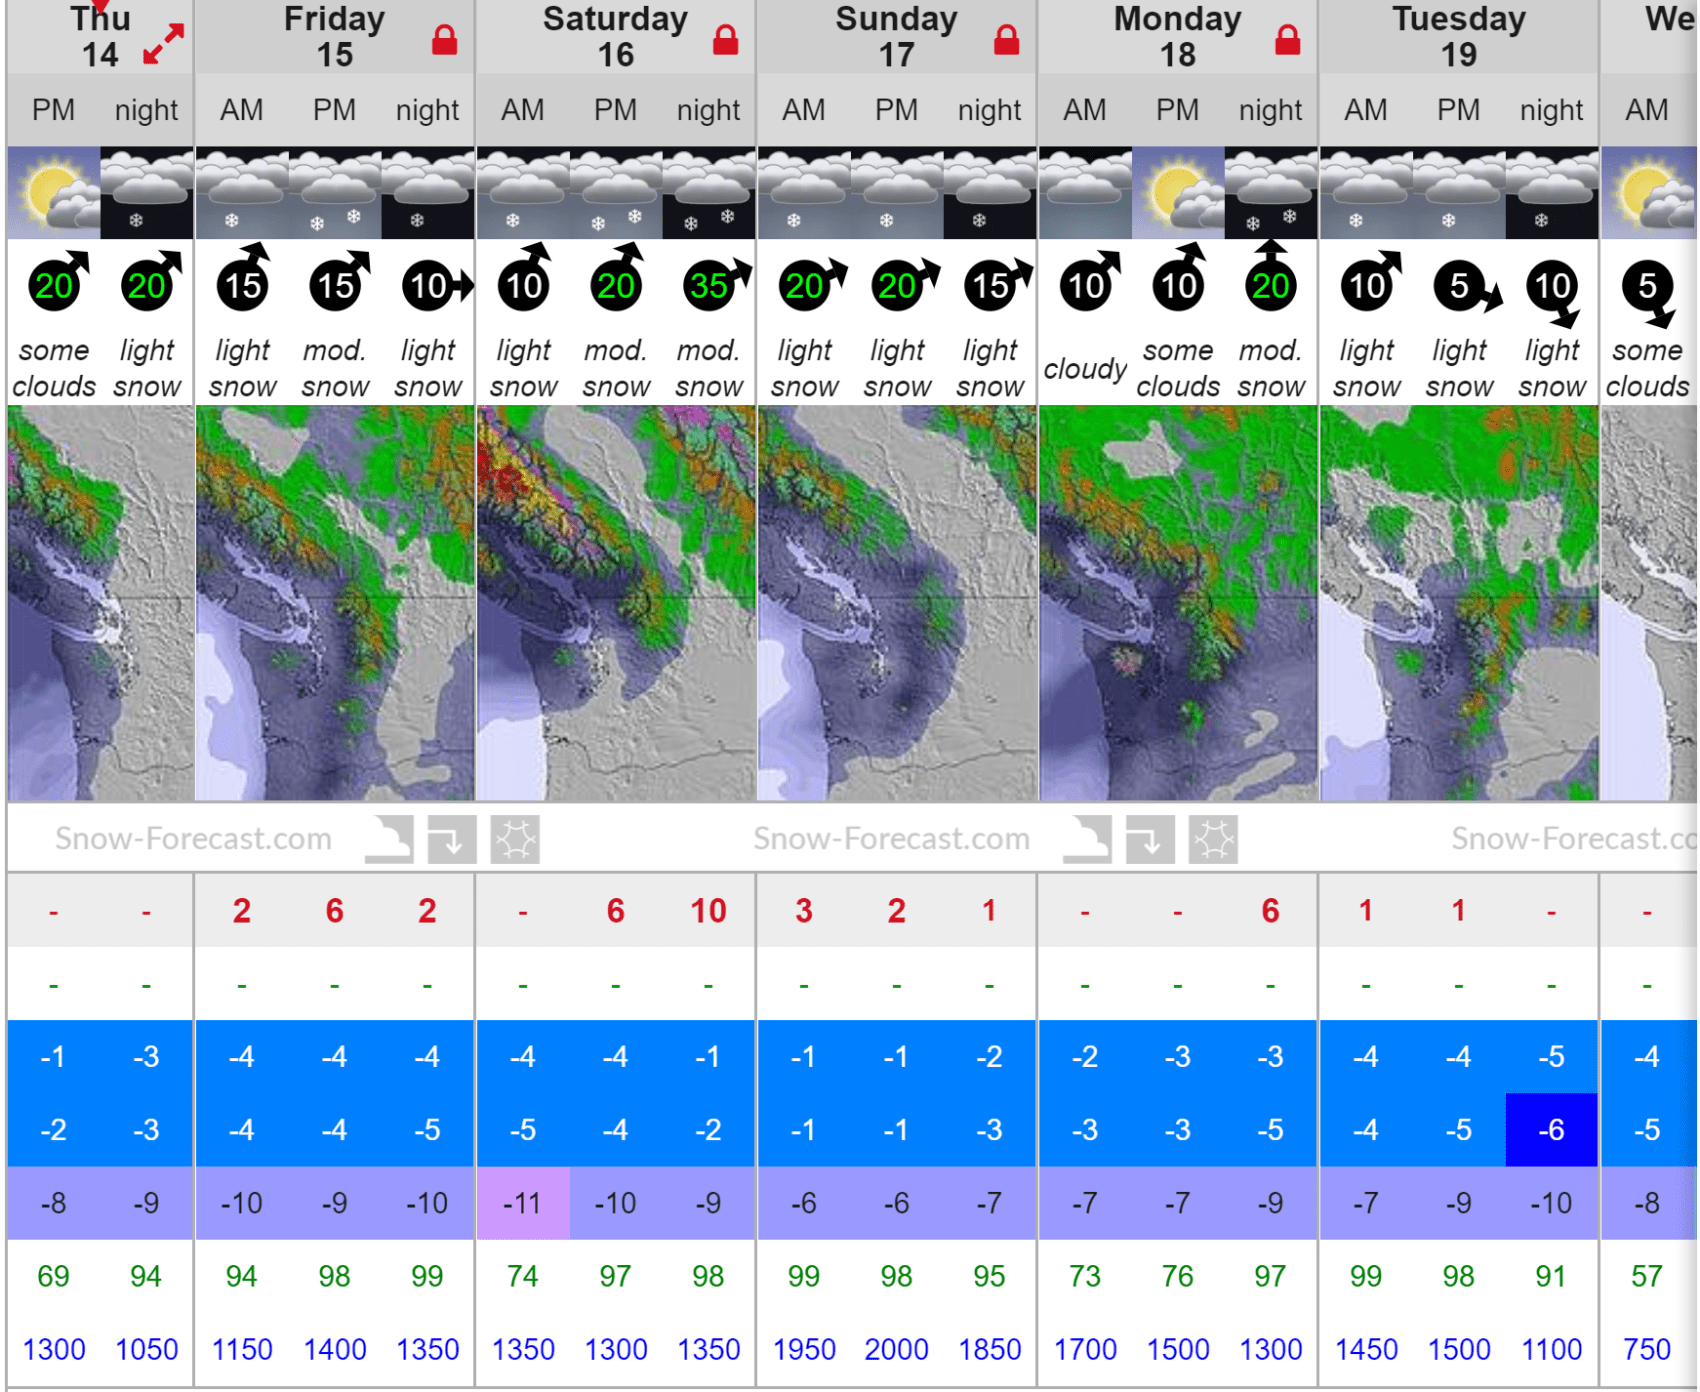
Alternatively, Snow-Forecast is a less-detailed but user-friendly snow forecasting tool. It grants a rough idea of precipitations, temperature, freezing levels, and wind speed/direction, perfect for when you’re short on time. The radar plot is another nifty feature that provides insight into how the weather changes over time in your area of interest. There’s nothing better than noticing a snowstorm creeping towards your home resort.
Avalanche Canada in tandem with Environment Canada offers the Mountain Weather Forecast, specific to Western Canada. It’s a gift from the snow gods. Professional forecasters summarize their findings in a detailed report spanning a full week, animated radar maps included.
Oli's Gnarly Advice
Avalanche Forecast
I watch in awe while avalanches race down the mountainside, ripping trees and splitting rocks along the way. While stunning to watch from afar, they are the real killer. Unfortunately, avalanche forecasting is an inexact science that takes years to get a grasp. That’s where your daily bulletin comes into play. Avalanche professionals head in the backcountry and gather snowpack data from sample snow pits. Forecasters then extrapolate the likelihood of an avalanche triggering based on snowpack observations, snowpit test results, and historical weather data. An AST-1 course will teach the basics of reading an avalanche bulletin.
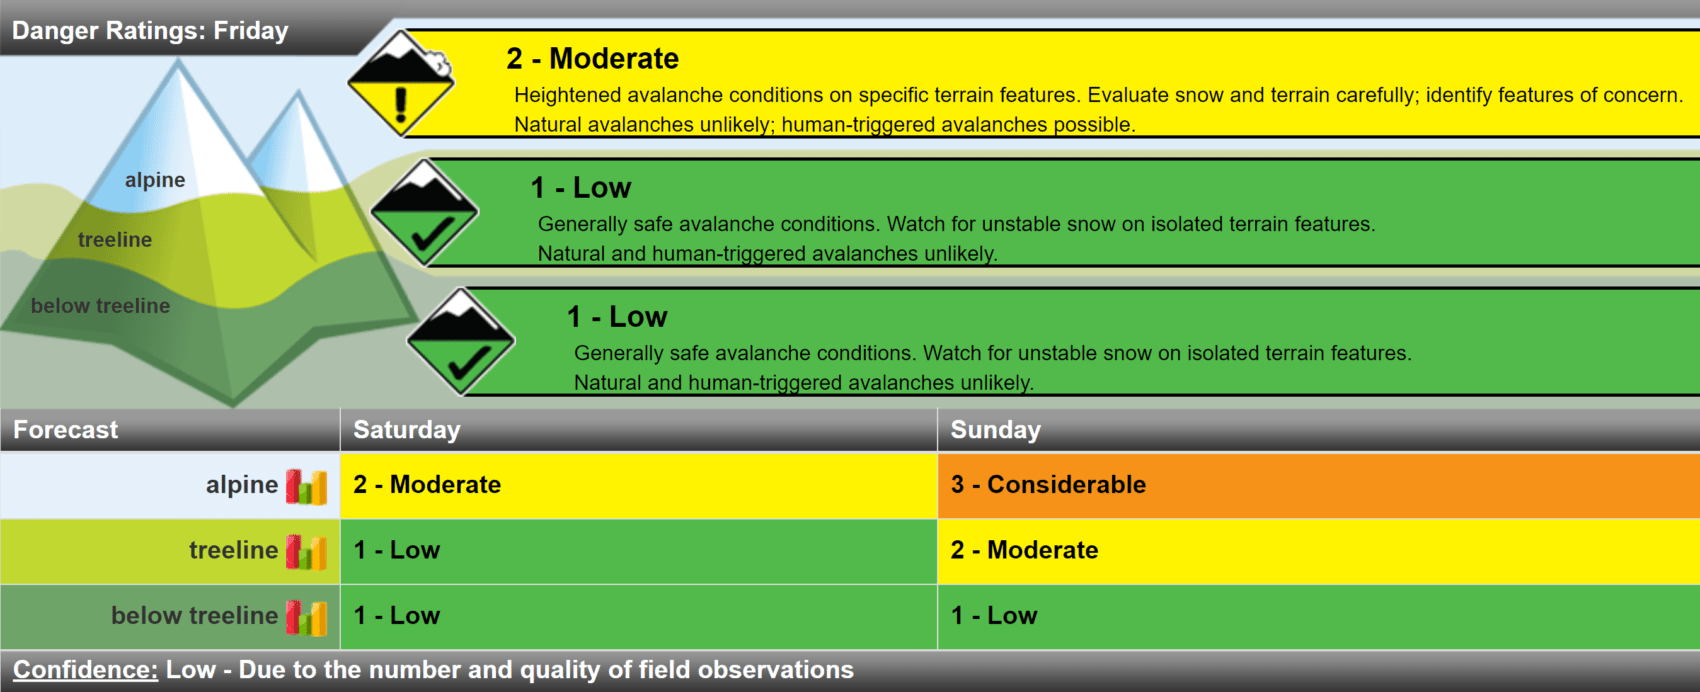
Avalanche Canada releases the bulletin for Western Canada. As for the Western United States, avalanche.org takes care of that.
Oli's Gnarly Advice
Park Information
Since some ski tours take place in National Parks, it’s worth mentioning their website is a great source for directives. My local area, Glacier National Park of Canada, otherwise known as Rogers Pass, is subject to avalanche control on a daily basis during the height of winter. Parks Canada prohibits access to large swathes of land if they plan on shelling nearby slopes. The system in place is called Winter Permit System. All must follow.
Oli's Gnarly Advice
Related Articles
– How To Choose Touring Skis in 2024
– How To Choose Ski Touring Boots in 2024
– How To Choose Ski Touring Bindings in 2024