I often get the question: how do I choose a pair of touring skis? The answer is as intricate as it is simple. Touring skis are incredibly complex, especially when you want them to perform on the uphill and downhill. Understandably, the cost of a pair makes choosing them even more daunting. Let me break it down for you. It all begins by answering the following question: what’s your playground? Where will your skis take you? Only then can you narrow it down to a selection derived from a series of key features. Here’s what I’m thinking. I’ll elaborate below on a logical step-by-step process that will help you choose a pair of touring skis.
Related: How To Choose Ski Touring Bindings in 2024
Pick Your Playground
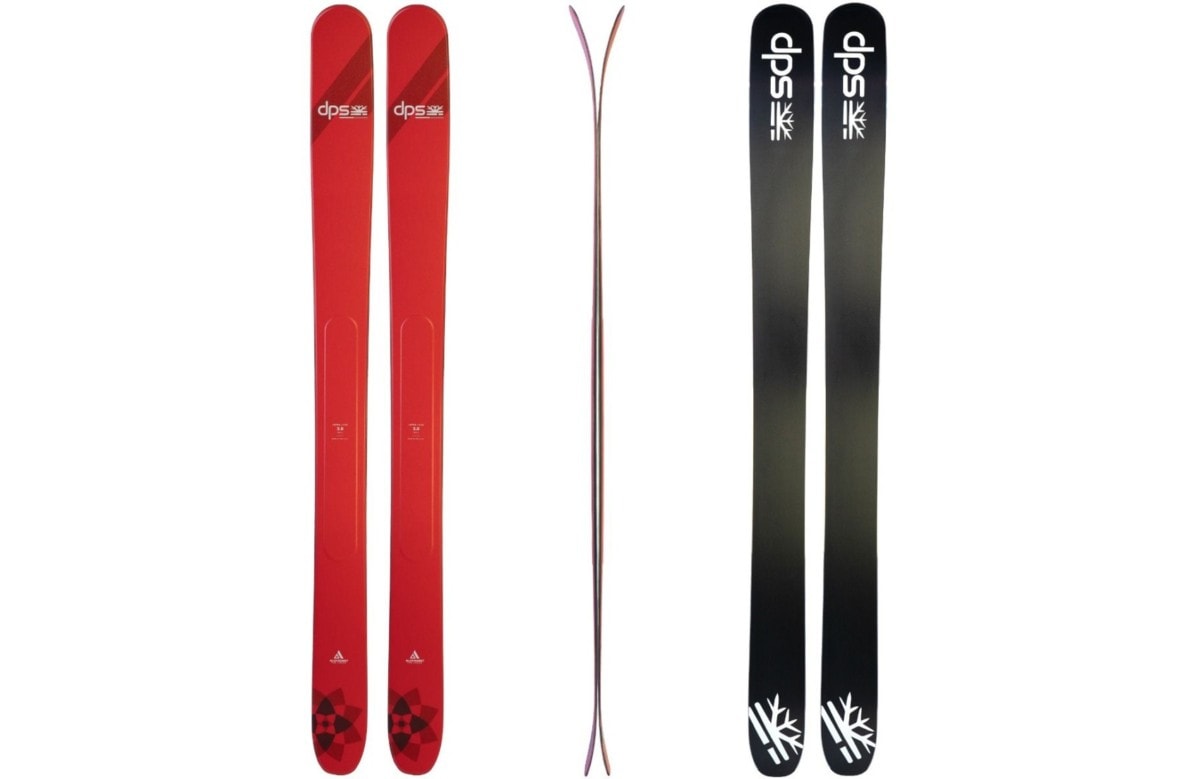
Do you plan on skiing the powdery fields of Rogers Pass or the rock-hard snow of the Rockies? In the ever-expanding outdoor gear industry, manufacturers design skis to perform well in a narrow set of operating conditions. A ski that excels in powder snow will most likely perform poorly on ice. Likewise, a heavy “charger” ski designed for lift-accessed touring will be quite the burden when hauled up a 4000m peak. Here’s an example. A powder ski (such as the DPS Alchemist Lotus 124) has a specific set of design features that provide ample floatation and easy turn initiation in soft snow (i.e. wide waist, wide shovels, short effective edge, early rocker, and twin tips). Those features render the ski useless on packed snow or icy slopes.
Here’s a sad fact (for your wallet that is): there’s no single quiver-killer touring ski – the industry is getting damn close, but we’re not quite there yet. All skis have strengths and weaknesses. You have to pick one of which you can live with the drawbacks. You’ve got to ask yourself:
- Would I rather shell out the big bucks for an array of skis covering all snow conditions and burn a hole in my wallet?
- Would I rather choose jack-of-all-trade, master-of-none touring skis and save some money in the process?
That’s really up to you and your budget. If you decide on the former, the solution is simple: get a pair of skis designed for every snow condition or outing type you would see in the backcountry. If you decide on the latter, tailor your ski selection to the conditions you will most likely encounter in your local terrain. Being a die-hard backcountry skier, I went with three pairs of skis that are still tailored to the local terrain and mostly always powdery conditions of Rogers Pass:
- Ski-Mountaineering: Scott Cascade 110 with pin bindings – super light, fragile, floppy
- Backcountry Powder Skiing: Atomic Backlands 107 with pin bindings – rather light, stiff, directional, powder-charger
- Resort and Lift-Assisted Touring: Moment Wildcat 116 with SHIFT bindings – heavy, burly, playful-charger
For a description of bindings types, see How To Get Into Ski Touring (Bindings).
Choose A Waist Width
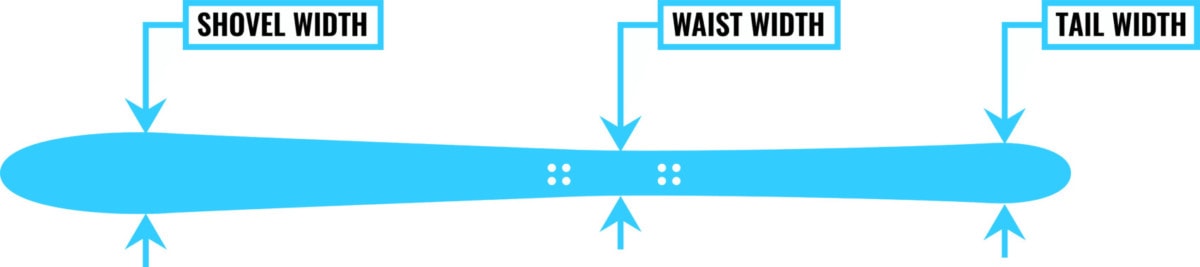
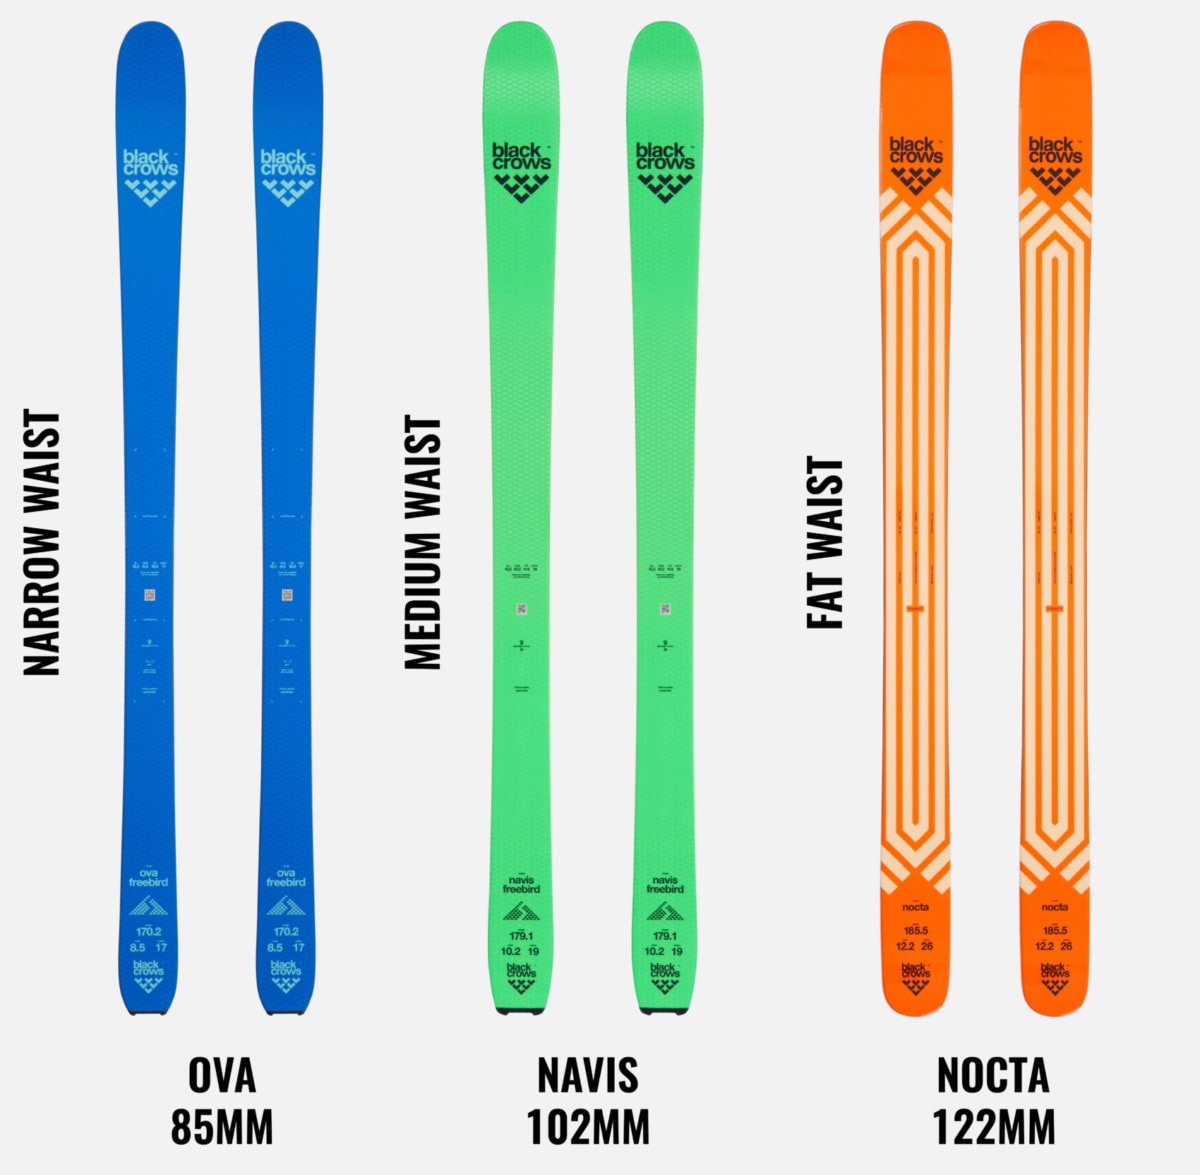
We use several width measurements to describe a ski, notably the waist, shovel, and tail width, with the first being the most important. The waist of the ski is located right under your boot. It’s the first measurement I look at when I choose touring skis. To simplify the process, let’s divide the waist width into three categories.
Narrow (75-95mm): the narrow waist width prioritizes performance on hard snow/ice, low weight, and edge-to-edge transition. It’s ideal for ski-mountaineering on wind-scoured faces, narrow couloirs, and days when you’ll be chasing some big vertical. They excel in areas with typically low snowfall such as the Rockies and the East Coast. Be wary, skis with a narrow waist are usually designed with other features (i.e. low weight, minimal tip rocker, and low stiffness) that aggravate their drawbacks such as terrible high-speed stability and low flotation in deep snow.
Medium (95-115mm): the medium waist width strikes the perfect balance between hard and soft snow performance. While still manageable on hardpack, they provide just enough float in the deep stuff. Being a bit heavier, the stable platform will be a dream on the downhill, but you’ll feel the legs at the end of a big day
Fat (115-130mm): the “fat” waist width is the king of powder skiing and bottomless snow. The wide waist provides more float than a 300-lb skier would ever need. However, those skis are absolutely terrible on anything other than soft snow. Don’t even think twice about taking those babies on icy slopes. On hardpack, the large width makes the ski cumbersome during the edge-to-edge transition and requires more effort to initiate a turn. This is probably the last category to complete your quiver as it is very specific to those ultra-rare bottomless pow days.
The shovel and tail width can be considered only after you’ve targeted a waist width category. They work in tandem with the waist to balance flotation in soft snow, turn initiation, and edge-to-edge transition.
Target A Weight Range
When it comes to weight, I have a short saying: “Go as light as possible, but not too light”. In an ideal scenario, you would have the lightest ski to haul uphill and the burliest ski on the downhill. I’ve got some bad news for you… for the most part, light equals soft. And, a soft, floppy ski is your worst enemy when bombing down a sweet backcountry run. High speeds naturally require a stiffer setup to dampen the increased vibrations. Depending on what use your ski will see, it’s important to stay within the following weight ranges for different applications.
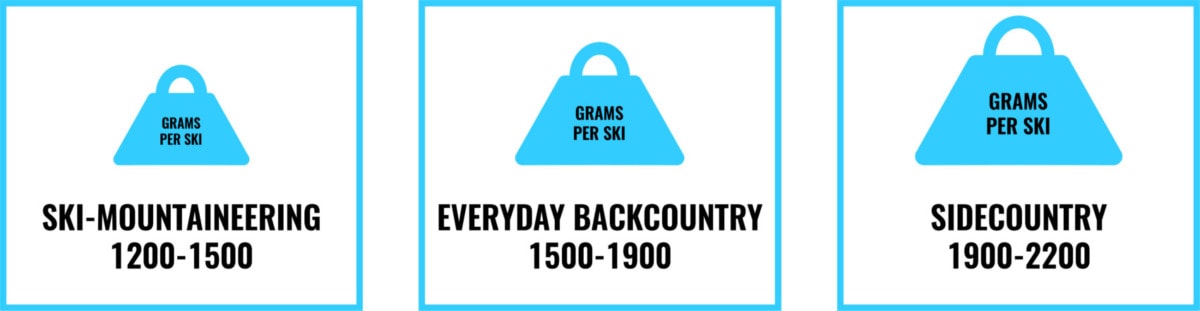
I’ve certainly climbed to the high alpine on skis that would otherwise be better for sidecountry touring. It’s best to loosely follow the above guidelines while not obsessing over it. After all, what’s the point of having the lightest ski if you’re fearing for your life on the way down? Personally, I won’t mind hauling a beefy ski on the uptrack if it grants me the descent of a lifetime.
Select A Profile
When you look sideways at a ski, you’ll notice all kinds of curves. This is called the profile of the ski. It directly affects how the ski will behave on snow. I’ve outlined four main profiles found on current models, although you’ll find a lot more variety out there.

Full Rocker: the full rocker profile, otherwise known as the reverse-camber or “banana” profile, provides maximum float in deep powder. On the flip side, they have a shortened effective edge which renders them useless on hardpack and at high speeds. Additionally, climbing skins hardly ever stay secured to rockered skis and provide little traction on the uptrack due to their minimal contact with the snow. This profile is very specific to powder skiing and nothing else. I wouldn’t recommend it for touring.
Full Camber: the full camber profile is typically used in racing skis. It provides the longest effective edge and the best edge hold on hardpack snow. The profile also allows the ski to flex more when carving, granting it a lot more “pop” or rebound energy when edging. The lack of early rise rocker means the profile will perform poorly in powdery conditions whereas your tips will simply dive below the snow’s surface – either that or you force yourself to be the world’s most backseat skier.
Mustache Rocker: the mustache rocker profile, otherwise known as the rocker/camber/rocker profile, is the holy grail of shapes when it comes to ski touring. It strikes the perfect balance between a rockered and cambered ski. The tip and tail have an early-rise rocker profile for some float in powder while the waist has a cambered profile for good traction and “pop” on hardpack. In this case, you get the best of both worlds. Most skis are designed in this way for good reasons. This is the profile I look for when I choose touring skis.
Neutral Camber: the neutral camber profile, otherwise known as flat profile, is hardly ever seen on the market. It’s not great or bad at anything. To be honest, I’m not sure why designers would target this profile.
A note on early rise rocker: watch out for floppy shovels (where the ski curls up). In an effort to reduce the ski’s swing weight, some manufacturers cut meat out of the shovels to a point where they vibrate excessively at speed. This turns your favourite super-G ski run into a horrifying experience.
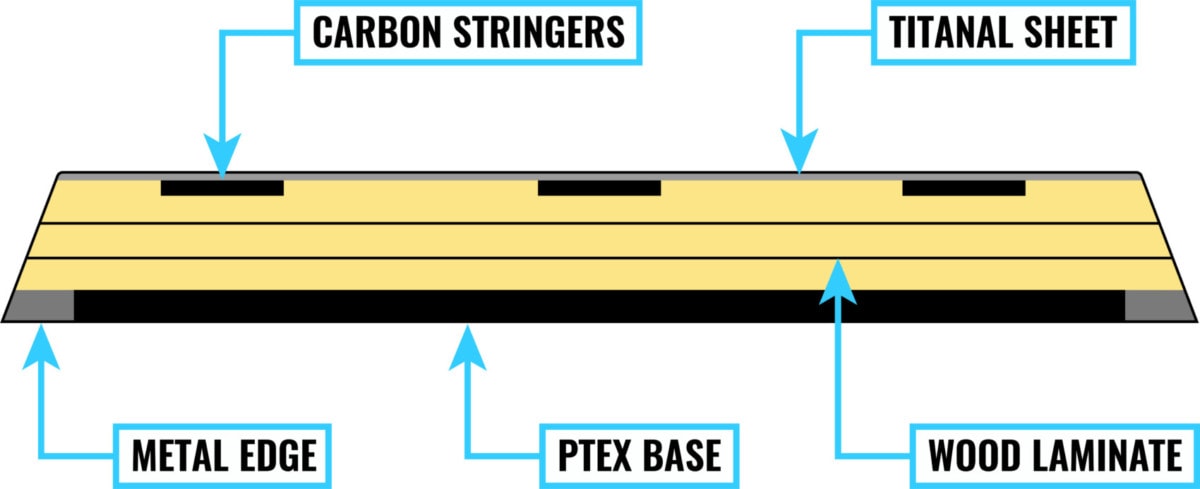
Review The Laminate Construction
You should also choose touring skis based on how they are built. Originally, making a ski was a simple matter. Thin sheets of wood were cut to size, stacked, glued, and cured using a combination of hydraulic press and molds. The process creates an arrangement of varying wood layers called the core laminate. In the last 15 years, advancement in laminate construction resulted in the use of composites, namely carbon fiber and fiberglass. The end goal was and still is to reduce weight while maintaining performance at a low manufacturing cost. Nowadays, all skis are built with some form of carbon or fiberglass. I’ve summarized below the different types of core laminates found in 2024.
Pure Composite: the pure composite laminate uses composites such as carbon, aramid, or flax fibers exclusively to achieve the desired characteristics. Those skis are ultra-expensive and usually designed for the niche sport of “skimo” racing, and professional ski-mountaineering competitions. They suck at anything other than climbing mountains on skis.
Hybrid: the hybrid laminate is where it’s at today. It involves metals, plastics, composites, and wood. It also provides the best balance between price tag, weight, and performance. It’s pretty rare not to find carbon stringers or honeycomb inserts laminated somewhere along the length of the ski.
Pure Wood: the pure wood laminate has one ingredient: wood. A favourite amongst old-schoolers, the feel of a wood-cored ski is simply unrivalled (according to them). The price tag is also usually much lower than their hybrid counterpart, but the ski’s weight may suffer.
A note on metal: manufacturers use an optimized blend of aluminum, zinc, magnesium, and copper called Titanal. A ski containing Titanal will most likely be damp, stiff, and heavy. Personally, I avoid Titanal skis for touring as they are simply way too heavy for my taste.
A note on foam skis: foam core skis are dominant amongst low-end models. Cheap, so so cheap. They will lose whatever little stiffness and rebound energy they have within a week. Avoid at all costs!
Verify The Tip and Tail Design
The shape of the tip and tail of the ski is also important when choosing a pair of touring skis. You must double-check that the ski’s tip will be compatible with the attachment system of your climbing skins, likewise for the tail clip. Some touring-specific ski models have a built-in notch at the tip and tail to secure the climbing skin. No matter how handy this seems, it really is a manufacturer’s effort at selling its branded skins for a little extra cash. Talk about milking the cow! Nowadays, premium attachment systems from G3 and Black Diamond work with pretty much all ski models on the market.
Pick A Length
All touring skis are offered in a variety of lengths. This is a hard one to decide on. Shorter skis, although lighter, provide less float and stability than longer ones. Since I’m not willing to compromise on downhill performance, I tend to size my touring skis like I size my resort skis. The increased confidence when skiing big lines is more than enough to justify the minor increase in weight.
A note on shorter lengths: shorter skis are more agile in a tight spot such as when skinning up trees or navigating a tight couloir.
Choose The Touring Skis That Feel Good
While you can obsess all you want about the numbers (as I do), it all boils down to choosing the touring skis that feel good. There’s no substitute for visiting your local gear store and renting demos for the day. I recommend trying out several pairs within the same day to get an idea of how they perform in identical snow conditions. Ski resorts commonly host demo days where manufacturers lend their skis for free. Give it a shot! This is a golden opportunity to try out your dream skis.
Related Articles
– How To Choose Ski Touring Boots In 2024
– How To Choose Ski Touring Bindings In 2024
– How To Get Into Ski Touring